This week will cover the use of the Navigation API (NavHost, NavGraph, NavController) to do basic navigation. Next week we will look at how we can create an App Bar and menu to enhance our navigation.
We will also take a look at delegated properties.
So far we have just looked at simple Android apps with a single screen. However, most real-world Android apps will feature multiple screens allowing the user to perform multiple operations. For example one screen might include a map, another screen might include a form allowing the user to add a new point of interest, and a third screen might show the app's settings.
How is this done? The previous approach was to use multiple activities for each screen, so that a secondary activity would be launched from the main activity. However it's now recommended to use the Android navigation API to navigate from one screen to another within a single activity. Luckily, Jetpack Compose works very well with the navigation API. With the navigation API and Compose, you define different composables in different screens, and host them in a NavHost - see below.
The navigation API consists of a series of classes which work together to enable navigation. It is a separate library from Compose itself so must be included as a dependency (see the documentation).
[libraries] section:
androidx-navigation-compose = { group = "androidx.navigation", name = "navigation-compose", version.ref = "navigationCompose" }
[versions] section of the version catalog, add the specific version:
navigationCompose = "2.8.7"
build.gradle.kts, link in the library in your dependencies section:
implementation(libs.androidx.navigation.compose)
The navigation API consists of these key classes:
NavHost: a "host" composable for your navigation. This contains all the composables for each screen within it.NavGraph: a data structure representing the different navigation destinations, known as routes. Each route has a name (in this respect, they are not unlike routes in web frameworks such as Express, for those of you who are familiar with web development).NavController: class to control the navigation. With the NavController you can navigate to other routes.You need to make these imports:
import androidx.navigation.compose.NavHost
import androidx.navigation.compose.composable
import androidx.navigation.compose.rememberNavController
NavController:
val navController = rememberNavController()This will setup a navigation controller and remember it if the screen rotates.
Surface, create a NavHost to host the composables:
NavHost(navController=navController, startDestination="mainScreen") {
    composable("mainScreen") {
        MainScreenComposable()
    }
    composable("settingsScreen") {
        SettingsComposable()
    }
}
This sets up a NavHost associated with the given NavController. We specify a lambda to set up the navigation graph. Note that the navigation graph is setup using a series of calls to composable() each of which takes two arguments: the route of that composable plus a lambda containing the appropriate composable for that route. So here we are specifying that:
mainScreen route corresponds to the MainScreenComposable();settingsScreen route corresponds to the SettingsComposable();NavController to navigate to a particular composable using its route, e.g:
navController.navigate("settingsScreen")
would navigate to the settingsScreen route, corresponding to the SettingsComposable. This might run, for example, in response to a button press or selecting a menu item.This is discussed in the Android documentation; see "Expose events from your composables".
An application making use of navigation would probably navigate to another composable by means of a button press or menu selection. How might we implement this? Let's say a press of a button from Composable A causes navigation to Composable B. We have a problem because the NavController is not accessible in Composable A: only the top-level, parent composable can access the NavController. So we can't directly navigate to Composable B from Composable A. So how can we do it?
NavController to Composable A. However this makes Composable A coupled to the NavController which is not ideal - we may, for some reason, want to change the navigation mechanism, and if we had to do this in all the child composables rather than just the parent, it would increase the maintenance effort.Surface composable (which has access to the navController), but pass it into Composable A as an argument. When the button is clicked in Composable A, it will run the callback (because it was passed into Composable A) without having any direct knowledge of what the callback is doing. Thus, Composable A becomes loosely coupled. It's not coupled to the parent composable because it doesn't have any direct reference to the parent's variables. It just has a callback, which could come from any application, and blindly calls the callback when the button is pressed.
So, in a callback approach, Composable A might look like this:
@Composable
fun ComposableA(addPersonCallback: ()->Unit) {
    Button(onClick = { addPersonCallback() } ) {
        Text("Add Person")
    }
}
Note how it takes a callback as a parameter, and calls that callback when the button is pressed.
The parent composable could then pass the callback in to ComposableA, as follows:
@Composable
fun ParentComposable() {
    val navController = rememberNavController()

    NavHost(navController=navController) {
        composable("mainScreen") {
            ComposableA(addPersonCallback = {
                navController.navigate("addPersonScreen")
            })
        }

        composable("addPersonScreen") {
            ComposableB()
        }
    }
Note how when we set up ComposableA we pass in a callback which when called (when the button in ComposableA is pressed) we'll navigate to the composable with a route of addPersonScreen.
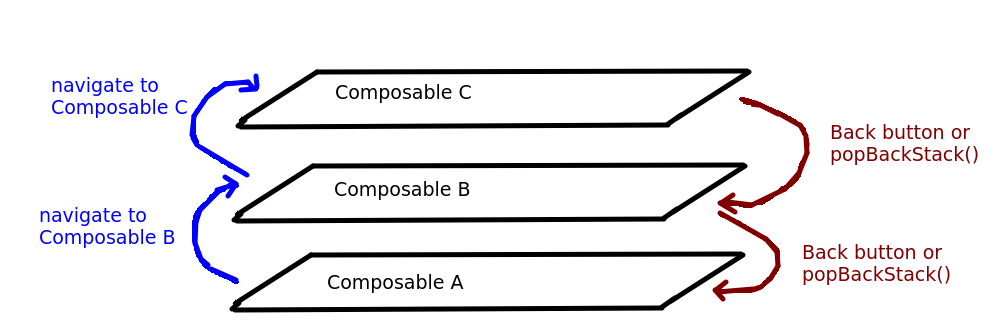
When using the Navigation API, each new navigation is added to a stack of screens (you all did stacks in Data Structures: see the COM421 notes for revision). Each time we navigate to a new composable, a new entry is added to the back stack, and when we press the "back" button, the top entry is removed from the back stack and we return to the previous composable.
The back stack is shown below:
This has some consequences for usability. For example, imagine a user starts by viewing Composable A and they then navigate to Composable B. What if we wanted to return the user to Composable A by clicking a button on Composable B? There are two ways we could implement this:
popBackStack() method of our NavController, e.g:
navController.popBackStack()So if we wanted to navigate back to Composable A from Composable B when the user clicks a button, we could pass a callback into Composable B (in a similar manner to the callback example given above) which calls
popBackStack().
The documentation here describes a common problem in navigation. As discussed in the documentation, if we have three composables on the back stack (A, B, and C) and the sequence of navigation is A to B to C, then back to A again, we might want to pop both B and C from the back stack when the user returns to A. How can we do that? We could call popBackStack() twice. But what if the user could also navigate from A to C, in which case we would only need to pop once. We clearly need some way of removing all composables above composable A. As the article discusses, we can use popUpTo() to remove everything from the back stack up to the composable passed in as an argument. To do this we must supply a lambda as the final argument of navigate(), containing the popUpTo() call. So for example:
navController.navigate("composableA") {popUpTo("composableA")}
will remove all composables from the back stack above the latest copy of composableA.
As well as an introduction to navigation, we will also cover the concept of delegated properties in Kotlin.
You will have seen this syntax when declaring state variables (which are data type MutableState) in Compose:
var name = remember { mutableStateOf("") }
As we have seen, you then use MutableState's value property to get the actual data from the MutableState object.
We can, however, use an alternate syntax as follows:
var name: String by remember { mutableStateOf("") }
If you use by remember, rather than just remember, you receive a variable holding the actual data, with a data type of whatever that data is (e.g. String in this example), rather than a variable of type MutableState. This means that you do not need to use the value property when accessing or updating the value, as the variable represents the data itself, not the MutableState. You can just read or update the variable directly - and the UI will still recompose (be redrawn) if it's updated. But how can this be, if the variable isn't a MutableState anymore? And what does the by mean? We have also seen it when initialising a ViewModel.
When we use by, we are using a Kotlin feature known as delegated properties. Delegated properties, like custom getters and setters, allow you to customise what happens when you retrieve or update a property (attribute) of an object. They do it with a delegate class; see the documentation for details. So delegates are rather like custom getters and setters, but rather than simply customising the getter and setter, you delegate the job of getting and setting a property to an entirely separate class - the delegate - which can give more flexibility in some situations. The by keyword specifies that we will be using a delegate.
Here is an example of a basic property delegate, to show how they work:
package com.example.delegates1

import kotlin.reflect.KProperty

class Student (var name: String, var course: String) {
    var mark: Int by MarkDelegate()

    override fun toString(): String {
        return "Student $name on $course with mark $mark"
    }
}

class MarkDelegate(private var controlledProperty: Int = 0) {
    operator fun getValue(thisRef: Any?, property: KProperty<*>) : Int{
        return controlledProperty
    }

    operator fun setValue(thisRef: Any?, property: KProperty<*>, newValue: Int) {
        if(newValue in 0..100) {
           controlledProperty = newValue
        } else {
            println("Cannot set ${property.name} to $newValue for $thisRef")
        }
    }
}


fun main () {
    val john = Student("John", "Software Engineering")
    john.mark = 101
    println(john)
    john.mark = 83
    println(john)
    john.mark = -1
    println(john)
}
Note how we are declaring a property mark inside the Student class but declaring it with by MarkDelegate(). This means that the MarkDelegate class will be responsible for handling retrieving the value of, and setting the value of, the mark property. MarkDelegate is thus a delegate. A delegate should contain two methods, getValue() and setValue(), which retrieve and update the associated value. Note also how the delegate class takes the property that it's controlling as a parameter:
class Mark(private var controlledProperty: Int=0)If you look at
getValue(), it's just returning the mark, so no custom behaviour occurs if we simply retrieve the value (e.g. by printing it). However setValue() is more interesting. Note how it take the new value as a parameter (newValue). The setValue() checks that the new value is in the range 0 to 100, and only updates the mark to the value if it is. So in other words, marks below 0 or above 100 will be rejected. So if we try to set the mark to any value less than 0 or greater than 100, it will not be updated. Note that the thisRef parameter in setValue() and getValue() refers to the object that the delegated property belongs to. Also the property parameter represents the property being controlled, and the property's name can be retrieved with property.name. Therefore the output of this program will be as follows:
Cannot set mark to 101 for Student John on course Software Engineering with mark 0
Student John on course Software Engineering with mark 0
Student John on course Software Engineering with mark 83
Cannot set mark to -1 for Student John on course Software Engineering with mark 83
Student John on course Software Engineering with mark 83
When we try to set the mark to 101 or -1, it's rejected. However when we set the mark to 83, it's accepted.
Note that you can pass additional parameters to the delegate, but the first parameter always reference the property that the delegate is controlling.
The relevance to Compose state, then, is that the MutableState is acting as a delegate for the underlying data (of type Int, String, and so on) stored within it. You get back a basic variable of type Int, String, and so on, from by remember, but it's controlled by a delegate. This delegate is the MutableState, and has a custom setValue() method. So, if we change the basic variable returned from by remember the delegate's setValue() (containing custom behaviour to redraw the composable) runs, and as a result, a recompose occurs.
IMPORTANT for this to work, you need to initialise your Style.Builder as an attribute of your MainActivity:
class MainActivity.... {
    var styleBuilder: Style.Builder = Style.Builder().fromUri("https://tiles.openfreemap.org/styles/liberty")
}
and then use the style builder as a variable when you initialise your MapLibre composable:
MapLibre(
     ....
     styleBuilder = styleBuilder,
     ...
)
by remember, in other words they use the MutableState as a delegate.addStudent() adds a student to the list and then syncs the live data - liveStudents - with the list.
class StudentViewModel : ViewModel() {
    val students = mutableListOf<Student>()

    fun addStudent(s: Student) {
        students.add(s)
        liveStudents.value = students
    }

    val liveStudents = MutableLiveData<MutableList<Student>>()
}