
Imagine a situation in which operations of a web service which change the database (such as leaving a review for HT-Tracks, or booking an item of accommodation for PlacesToStay) required the user to login. Now imagine that client websites, such as your fan site or VisitHampshire, wanted to allow their users to perform these operations. How could it be done?
Firstly the client site (consumer) needs to identify itself to the service (provider). This is done as follows:
Here is a description of the entire OAuth2 authentication process which takes place when the user interacts with a client (consumer) site.
Authorization: Bearer 0dc176676acfb98987edcb787....
This is shown here:
Aaron Parecki has written an in-depth introduction to OAuth2: this can be found here
.PHP has an official OAuth extension which makes it relatively easy to develop OAuth clients and servers, but unfortunately this only supports OAuth1, not OAuth2. (OpenStreetMap still uses OAuth1, so if you need to write a consumer to OSM, you'll have to develop an OAuth1 client). However, luckily a third party library exists for developing an OAuth2 client, namely the PHP League's oauth-client. This can be obtained here.
The logic of an OAuth2 client is set out below. We are assuming here that a
single page, index.php, both sends the original authorisation request
and acts as the registered callback.
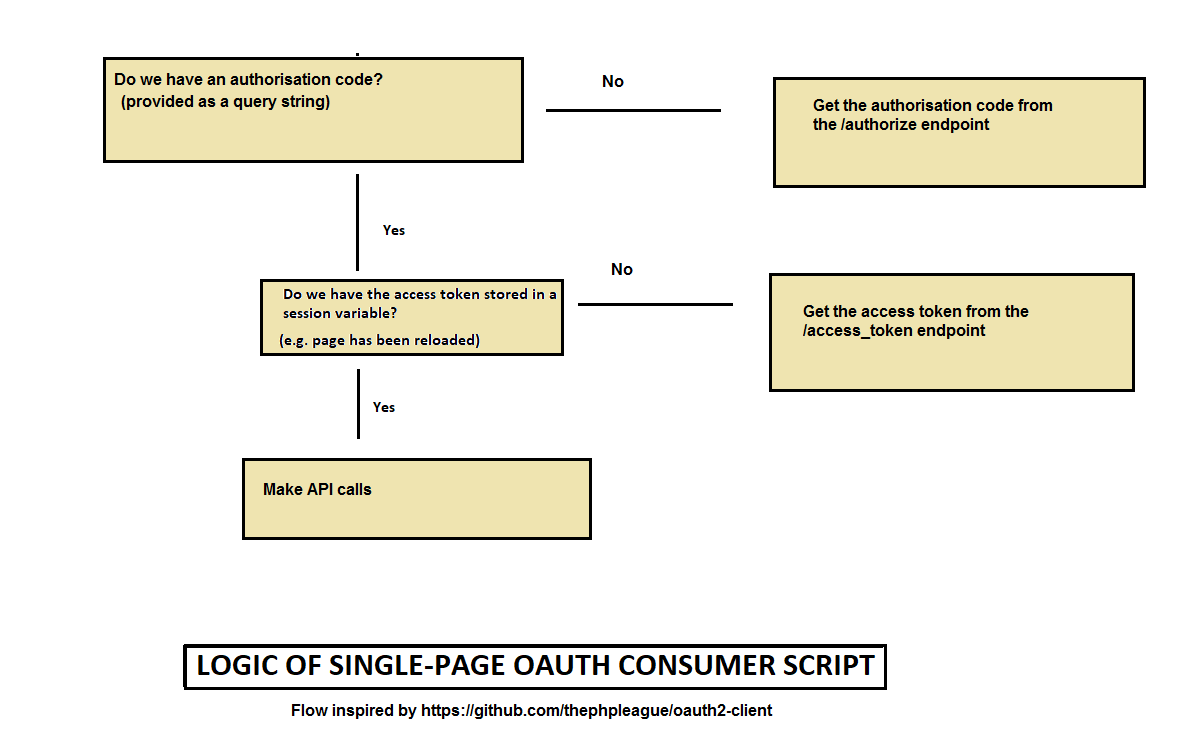
Our script starts by checking whether an authorisation code was passed in via GET. If it was, we've redirected from the /authorize endpoint on the provider. If it wasn't, we're starting from the beginning and so need to request an authorisation code:
<?php
// Load our Composer-installed dependencies
require_once 'vendor/autoload.php';

// Create an object representing the provider.
// Note how we have to provide our client ID and secret, and also
// the /authorize and /access_token endpoints.
// We also supply the redirect URL in case we didn't specify it when we
// registered our app.

$provider = new \League\OAuth2\Client\Provider\GenericProvider([
    'clientId' => 'YOUR CLIENT ID',
    'clientSecret' => 'YOUR CLIENT SECRET',
    'redirectUri' => 'YOUR CLIENT REDIRECT URL',
    'urlAuthorize' => '/authorize ENDPOINT ON PROVIDER',
    'scope' => 'all',
    'urlAccessToken' => '/access_token ENDPOINT ON PROVIDER',
    'urlResourceOwnerDetails' => 'BASE URL OF PROVIDER API'
]);

session_start();

// If an authorisation code was NOT supplied as a query string..
if(!isset($_GET["code"])) {

    // Get the full URL for the /authorize endpoint
    $authUrl = $provider->getAuthorizationUrl();

    // Get the state (see below)
    $_SESSION['state'] = $provider->getState();

    // Redirect to our /authorize endpoint
    header("Location: $authUrl");
}
Most of this has been explained in the code comments. The only aspect which has not is the state. Note that when we begin, we store the provider object's state in a session variable. This is a random string which we store in a session variable and check later, when we get the code back from the provider; we check that the provider sends back the same state we started with. This guards against interception attacks during the authorisation process.
Next, we write the code to handle the authorisation code having been returned from the provider:
// Check that the state sent back from the server is the same as the original (see above)
elseif(empty($_GET['state']) || (isset($_SESSION['state']) && $_GET['state']!=$_SESSION['state'])) {
    unset($_SESSION['state']);
    echo "Possible security violation detected - quitting";
} else {
    if(!isset($_SESSION["accessToken"])) {
        echo "No saved access token, getting one <br />";
        $accessToken = $provider->getAccessToken('authorization_code',
            ["code"=>$_GET["code"]]);
        $_SESSION["accessToken"] = $accessToken;
    } else {
        echo "We already have an access token, using that";
        $accessToken = $_SESSION["accessToken"];
    }
    echo "Has access token expired? ".($accessToken->hasExpired() ? 'yes': 'no')."<br />";
    ....
Hopefully this code should be clear. We first check the state (see above) and then
see if we have an access token stored in a session variable already. If we have,
we can use it. If we haven't, we need to exchange the authorisation code for an access token
by calling the access token endpoint of the provider. This code example also displays whether
the access token has expired or not. If it has expired, it will no longer be possible to use
it to call our provider API.
Next, now that we have an access token, we can use it to make an API call. This is making an imaginary call to a photo/upload route in the provider's web service API:
    // Form an object representing the HTTP request
    $request = $provider->getAuthenticatedRequest(
        'POST',
        'http://localhost/oauth/oauth_server/api/photo/upload',
        $accessToken
    );
    echo "<h2>Making a request to the Open Panos API</h2>";


    // GuzzleHttp is an object-oriented PHP HTTP client - fulfils same role as cURL
    $client = new GuzzleHttp\Client();

    // Send the request and get the response
    $response = $client->send($request)->getBody();

    // Decode the JSON
    $responseData = (string)json_decode($response);

    // Display the response. Imagine the JSON returned has a 'msg' field.
    echo "Response from API: <strong>{$response->msg}</strong>";
As we can see, this code sends a request to an API URL, passing in the access token, which is
sent in the HTTP header in the form:
Authorization: Bearer ab767c678de988f78...
So that's it! The only thing we need to add is some error handling. You should wrap all the code in the "else" block (i.e. if we have an authorisation code and valid state) inside a "try/catch" block to handle errors thrown by the provider. e.g.
try {
    // get access token if needed, and make your API calls
} catch(\League\OAuth2\Client\Provider\Exception\IdentityProviderException $e) { // thrown with invalid tokens
    echo "Exception: {$e->getMessage()}";
} catch(GuzzleHttp\Exception\ClientException $e) { // thrown if API returns an HTTP error code
    $status = $e->getResponse()->getStatusCode();
    echo $status==401 ? "This access token does not grant upload permission" :"HTTP error $status";
}
Often as a web developer you will only be interested in consuming other people's OAuth services. However you may well be interested in how to develop an OAuth2 server yourself. We may return to this in a future Wednesday Web session, but for now, here are a couple of pointers:
You are going to write an OAuth2 client to OpenTrailView (www.opentrailview.org) to allow users to add tags to panoramas. To do this:
php ~vmadmin/composer.phar require league/oauth2-client
https://www.opentrailview.org/addAppMake sure the callback URL points to a location on your space on Neptune and includes "index.php"! Note down your key and secret!
  $request = $provider->getAuthenticatedRequest(
        'POST',
        'https://opentrailview.org/oauth/api/tag/add',
        $accessToken,
        ["headers"=>["Content-Type" => "application/json"],
        "body"=>json_encode(["tag"=>"some tag", "panoid"=>n])]
    );
(where n is a number from 1-20, representing a panorama ID.)
https://www.opentrailview.org/panorama/nwhere n is your chosen panorama ID.