So far on your course you have been introduced to the fundamentals of programming using Python. You have learnt about variables, loops, conditional statements, arrays and functions. The style of programming that you have been introduced to so far is known as procedural programming. Procedural programming involves using reusable functions to perform common tasks, such as calculating the distance between two points, the area of a circle or a factorial, or printing a certain character a certain number of times. In this unit, however, you will learn object-oriented programming. Object-oriented (OO) programming involves writing code to represent real world objects such as a student, a car, players and enemies in games, or graphical user interface elements such as windows and buttons. As you will hopefully see in this unit, once you have learnt it, OO programming leads to more readable, more maintainable code.
There are many different OO languages, such as Java, C#, C++ and Objective-C as well as less-well-known ones such as Smalltalk. The language used in this unit will be Java. Java is one of the most commonly-used OO languages today, and is the main language used to develop Android apps. It is also used in many general-purpose desktop and web applications. The principal benefit of Java is that it is cross-platform: you can write a Java program on Windows and the same program will work on other operating systems such as Linux or Mac OS X.
Java is a combined compiled/interpreted language. What does this mean?
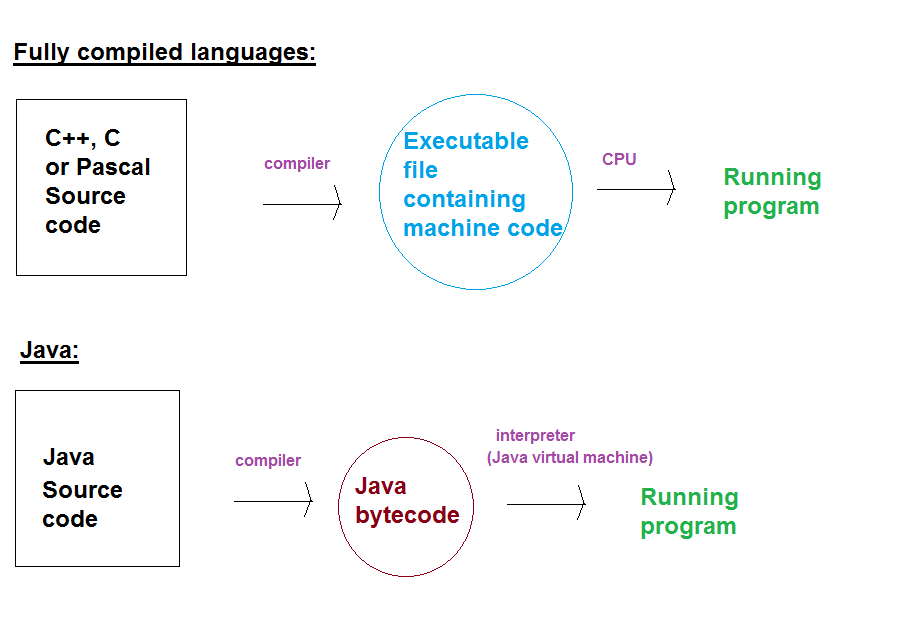
Java does not exactly fit into either category, but instead adopts a hybrid approach. You compile a Java program, but it is not compiled into native machine code. Instead, it is compiled into a format known as bytecode. Bytecode is a binary format understood by the Java Virtual Machine. The Java Virtual Machine (part of the Java Runtime Environment (JRE)) is a piece of software which reads and executes Java bytecode, and in doing so, runs your Java program. This is the interpreted part of the Java system. The result is that any computer with the JRE installed can read Java bytecode. So you can distribute Java bytecode to Windows, Linux or Mac systems, and as long as they have the JRE installed, they will all be able to run your program. Because it is a compact, machine-friendly format, the Java Virtual Machine can read Java bytecode faster than interpreters in pure interpreted languages can read text files of source code.
The diagram below compares a standard compiled language and Java.
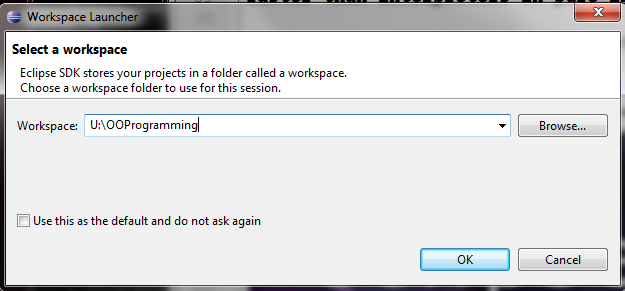
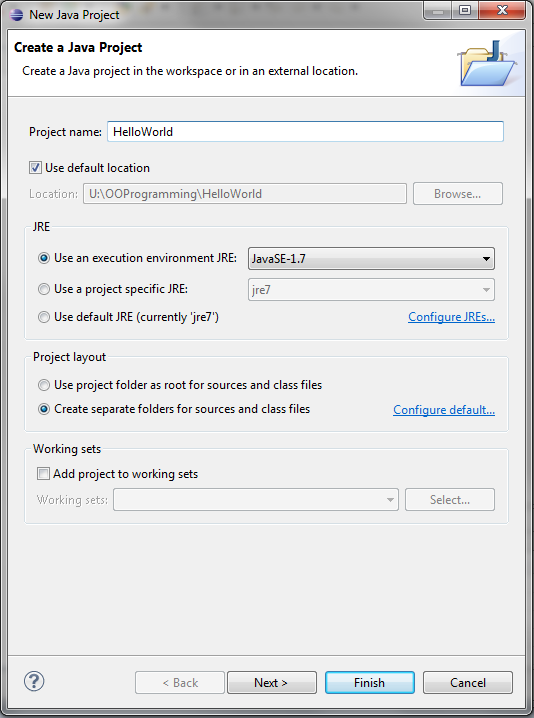
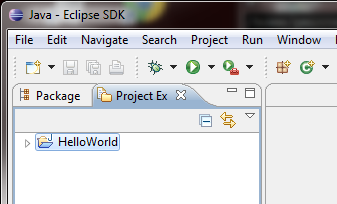
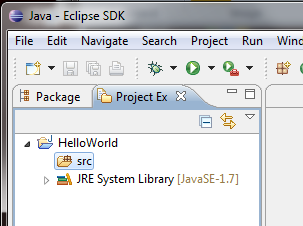
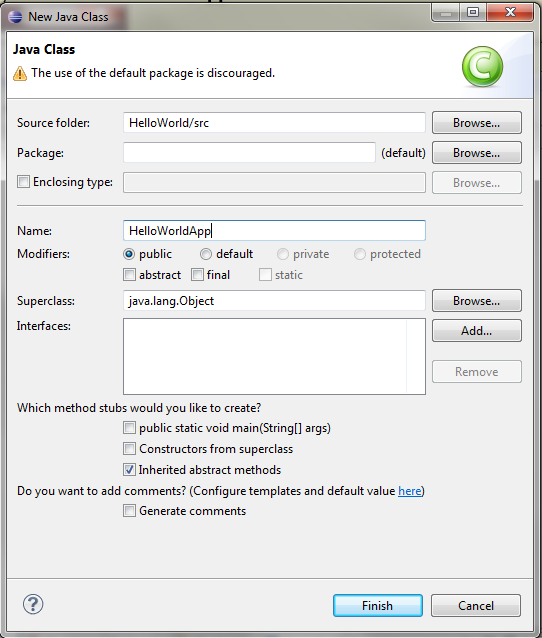
In this unit we will use the Eclipse Integrated Development Environment (IDE). Eclipse uses the concept of a workspace and projects. A project is an individual program you might be working on: it can contain one or more Java files. A workspace is a collection of projects. So you might have one project per topic, and one workspace for the whole of the first year (then another workspace for Year 2, containing your work next year).
Find Eclipse on the system and click on the icon.
public class HelloWorldApp
{
    public static void main (String[] args)
    {
        System.out.println("Hello Object Oriented World!");
    }
}
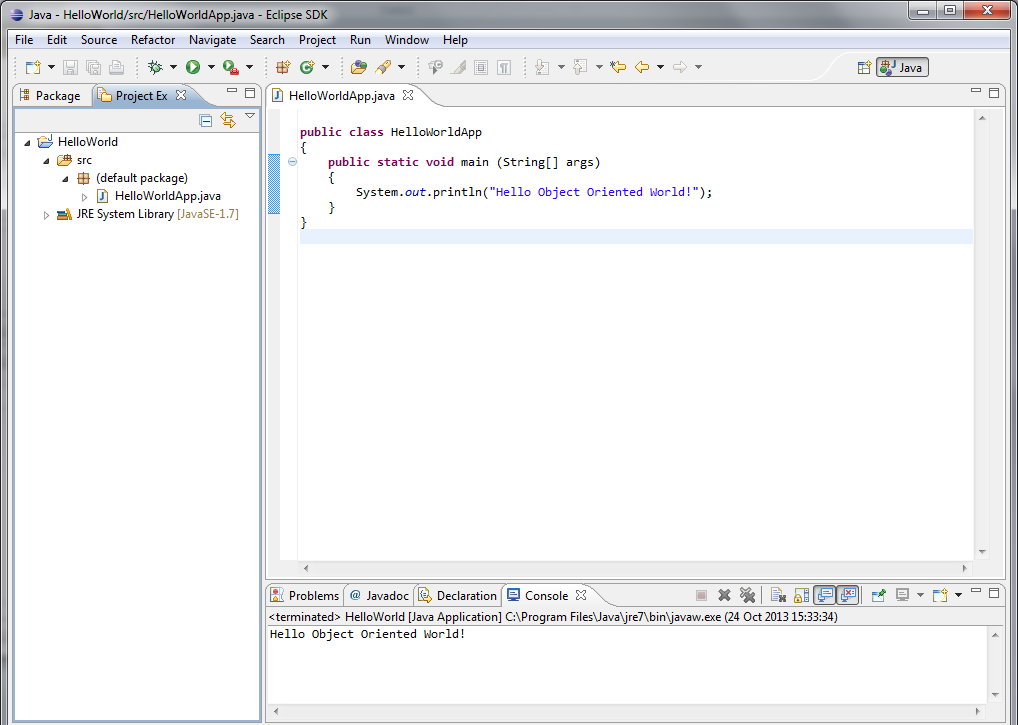
We will now explain the Java code line by line.
public class HelloWorldAppAll Java programs consist of one or more classes. A class is basically a code representation of a real-world entity, such as a person or a cat. Here, the class is representing the application as a whole, which is why we have called it HelloWorldApp.
{
Opening curly brackets begin a code block. A code block is a section of code associated with the
previous statement. Here, the previous statement was the declaration of the class, so this curly bracket
begins the code associated with the class.
Other statements in Java, such as if statements or for loops, also use curly
brackets: you will see those later.
public static void main (String[] args)This begins the main() method. A method is a function (you have done functions already in Introduction to Programming and Problem Solving) inside a class. The main() method is a special method in Java: it is the entry point of the program. So when you run a Java program, the first code that will be run will be the code inside the main() method.
{
The declaration of the main() method is followed by another curly bracket. In a similar manner to the previous
curly bracket beginning the class, this curly bracket begins the
code associated with the main() method.
System.out.println("Hello Object Oriented World!");
The System.out.println() statement prints the specified message to the screen. So here,
Hello Object Oriented World! will be printed to the screen.
}This curly bracket closes the main() method.
}... and the second curly bracket closes the class.
Java has the standard set of arithmetic operators, which are the same as many other languages.
A difference between Java and Python is that Java is a strongly typed language. What does this mean? Whereas in Python, you do not need to declare the data type of a variable (by data type, we mean integer, floating-point, string and so on), in Java you do. Java has the following data types. These types are all known as primitive types. A primitive type is a fundamental data type built into the language, as opposed to a user-defined data type, created by the developer.
When you wish to use a variable for the first time in Java, you have to declare it. Declaring a variable involves stating its name and what data type it is. If you try to use a variable without having first declared it, you wil get an error. For example, the code extract (note that this is not a complete program, just an extract of code):
int a;
a=3;
will declare that the variable a exists and is an int, and then assigns the value 3 to it. However:
a=3;on its own will give a compiler error as the variable a has not been declared yet. We can also declare a variable and initialise it in one statement. The following does this:
int a=3;
Here is a complete program which declares some variables and uses them.
public class VariablesApp
{
    public static void main (String[] args)
    {
        int a;
        a = 2;
        System.out.println("The variable a is: " + a);
        double b = 3.1415927;
        System.out.println("The variable b is: " + b);
        float c = 1.234f;
        System.out.println("The variable c is: " + c);
    }
}
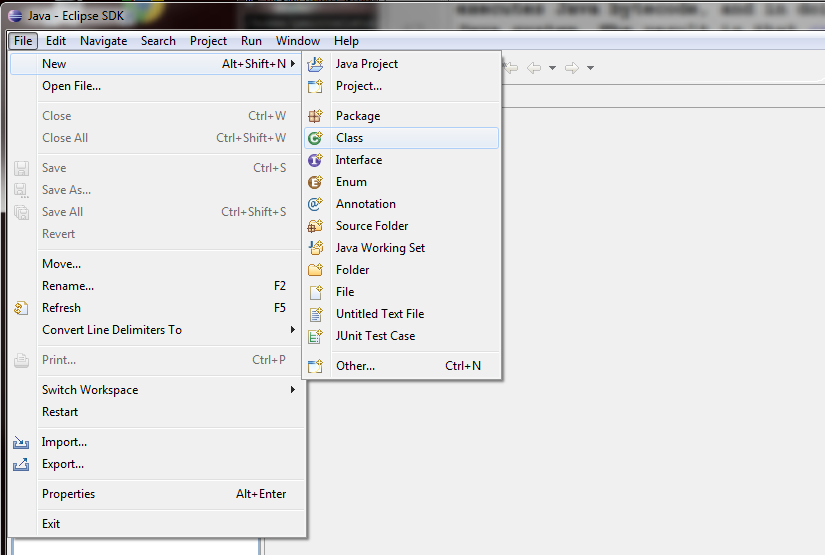
Create this program in your current project, enter it and run it (you can specify which class to run by selecting it on the Project Explorer on the left-hand side). Note how, when we initialise a float variable, we have to add the character "f" after the number, i.e. 1.234f. This distinguishes between double and float numbers. A decimal number without an "f" is treated as a double, while one with an "f" is treated as a float.
Add the following line to the end of your main():
d = 4;Does your program compile? If not, why not? Fix the program so that it compiles.
When dealing with basic Java data types, you might come across a loss of precision error. Try adding the following line to your VariablesApp:
int e = 2.718281828;Does this work? You will find it generates a loss of precision error. The number 2.718281828 is a double. However, we are trying to put a double inside an int variable. int variables can only hold whole numbers, so we are unable to store the double inside the variable without losing precision. Because this sort of situation is likely to be a programming error, the compiler refuses to allow the loss of precision and generates an error.
float f = 40075.16;Why does the compiler give you an error? Correct this statement while keeping the data type of the variable f as float.
Java also has the concept of a string. As you should know from your Period 1 unit, a string is a sequence of characters and is therefore used to store words, sentences, paragraphs and so on. In Java, the data type for a string is String. Unlike the data types you met above, however, String is not a primitive type. It is a class. Remember you saw earlier that a class is a representation of a real-world entity. So the Java String class is a representation of a string.
Luckily, strings are quite easy to use. Here is an example program which uses strings. Create a new program within your project as follows:
public class StringsApp
{
    public static void main (String[] args)
    {
        String str, str2;
        str = "Hello";
        str2 = "World!";
        System.out.println(str);
        System.out.println(str + str2);
        System.out.println(str + " " + str2);
    }
}
This example shows how we declare String variables in the same way that we declare variables using
primitive types. The example also shows some other new concepts:
String str, str2;We could also declare and initialise multiple variables on the same line, e.g.:
String str="Hello", str2="World!";
There are some subtleties with string concatenation. Try adding the following to your main():
System.out.println("The sum of 1 and 2 is: " + 1 + 2);
The problem with the above example is to do with the way addition operators are processed and what Java does when a string and a number are added together. They are processed from left to right by default. If a string and a number are added together, Java basically converts the number to a string and does a string concatenation. So the first thing that happens is that the string "The sum of 1 and 2 is: " and 1 are concatenated and we get the string:
The sum of 1 and 2 is: 1Then the 2 is added. However, the result of the first addition is a string, and so this second addition is also treated as a string concatenation and we get the result:
The sum of 1 and 2 is: 12Clearly wrong!
How do we solve this? We make use of parentheses (brackets) to force Java to evaluate the integer addition before doing the string concatenation. So if we try to do this:
System.out.println("The sum of 1 and 2 is: " + (1 + 2));
the expression in the brackets (1 + 2) is evaluated first (bracketed expressions are evaluated first
see BODMAS)
and we get the number 3. Then, the string "The sum of 1 and 2 is: " is concatenated with the
result of the bracketed addition, i.e. the number 3, and we get:
The sum of 1 and 2 is: 3
What output will this give?
System.out.println(1 + 2 + " is the sum of 1 and 2");Try and work it out before you test it. Why do you get this result?
To obtain user input in Java, we use a Scanner. Here is an example of the use of a Scanner:
import java.util.Scanner;

public class ScannerApp
{
    public static void main (String[] args)
    {
        String str = "";
        Scanner scanner1 = new Scanner (System.in);
        System.out.println("Please enter a string:");
        str = scanner1.nextLine();
        System.out.println("You entered: " + str);
    }
}
To consider this example:
Scanner scanner1 = new Scanner(System.in)This line creates a new scanner called scanner1 and associates it with standard input (System.in). Standard input represents the flow of information from the keyboard to the program. (Likewise, standard output represents the flow of information out of the program, typically to a screen; this is what System.out represents in System.out.println().
import java.util.Scanner;We will cover the precise meaning of this in more detail next year but the best way to think of it at the moment is as follows. Some Java functionality is available to us by default (e.g. System.out.println) but other functionality has to be imported into our program from what is called a package. So what this line is doing is importing Scanner from the java.util package.
It is possible to use the Scanner to read in numbers from the keyboard. There are dedicated methods for doing this, such as nextInt() or nextDouble() (rather than nextLine() ) but using a mix of these and nextLine() can lead to problems where new line (ENTER) characters are left in the input and can disrupt subsequent attempts to read in data. So a better approach is to read in everything as a string and convert the string input to a numeric data type, as required. The example below shows this:
import java.util.Scanner;

public class NumberScannerApp
{
    public static void main (String[] args)
    {
        String str = "";
        Scanner scanner1 = new Scanner (System.in);
        System.out.println("Please enter an integer:");
        str = scanner1.nextLine();
        int i = Integer.parseInt(str);
        System.out.println("You entered the integer " + i);
    }
}
Note how we read the input in as a string and then convert it to an integer
using Integer.parseInt(). Integer.parseInt() is commonly used in Java: it takes in a String
as a parameter and returns an integer. There are similar methods for other numeric data types, such as
Double.parseDouble() for converting strings into doubles.
Write a program to read in two numbers from the keyboard and add them together.