Topic 9: JDBC and SQLite
Today we will look at connecting to a database using JDBC. However before we do so, we need to take a look at error handling with exceptions.
Introduction to Exceptions
We will start today with a quick introduction to error-handling with exceptions. We will not cover exceptions in full, just enough to use them with JDBC. However I have provided more complete notes here for you to read in your own time.
Note that some of the exceptions notes are based on the originals by
John Flackett, but reworded
Use of exceptions
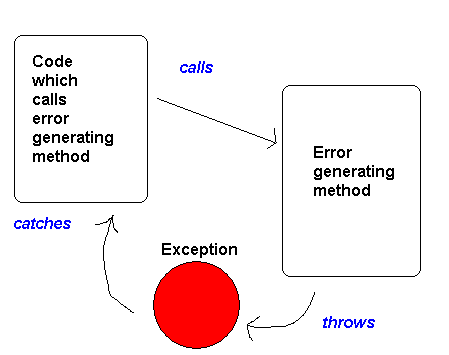
- Often our programs encounter unpredictable errors, which are not the fault of the user
- For example, a network connection might be lost, or a hard drive might be corrupted (meaning we cannot read files)
- Such unpredictable errors can be handled by the use of exceptions
- When we encounter an error, we throw an exception
- An exception is a special object which is generated when the error
occurs
- We then catch the exception in the calling code
What is an exception class?
IOException is part of the standard library- In general, an exception class which inherits from the standard library class Exception.
- This allows us to use certain features common to all Exceptions
- When we create the exception, we can store information about the exception
within it
Examples of built-in Exceptions
- There are many built-in exception classes in Java
- These include:
Checked and Unchecked Exceptions
- Normally, exceptions must be caught
- Such exceptions are known as checked exceptions
- They typically represent unpredictable errors, which cannot be guarded against in advance, for example loss of network connectivity, or running out of hard drive space
- The compiler will give an error if we do not catch a checked exception
- However, if we inherit from
RuntimeException we do not have to catch them
- RuntimeExceptions are also known as unchecked exceptions as
we do not have to catch them
- RuntimeExceptions can be guarded against with careful programming, for example you can prevent a
NullPointerException by checking none of your objects are null!
Introduction to JDBC
JDBC stands for Java Database Connectivity and provides a common standard for connecting to any supported database, such as Oracle, MySQL, PostgreSQL and so on. The great advantage of JDBC over the "native" methods for connecting to each database is that the same code (the JDBC API) can be used to connect to different databases. The only thing you need to change is the driver and connection.
JDBC drivers
JDBC connects to a range of different databases using drivers. Each database has its own driver, and the driver provides the interface between JDBC and the native database. In other words, the driver translates the common interface that JDBC provides into the specific implementation details needed for each type of database. So there is a MySQL driver, an Oracle driver, and so on.
The diagram below shows a typical architecture of a JDBC application, showing the different components and how they interact. Note that not all databases include all layers.
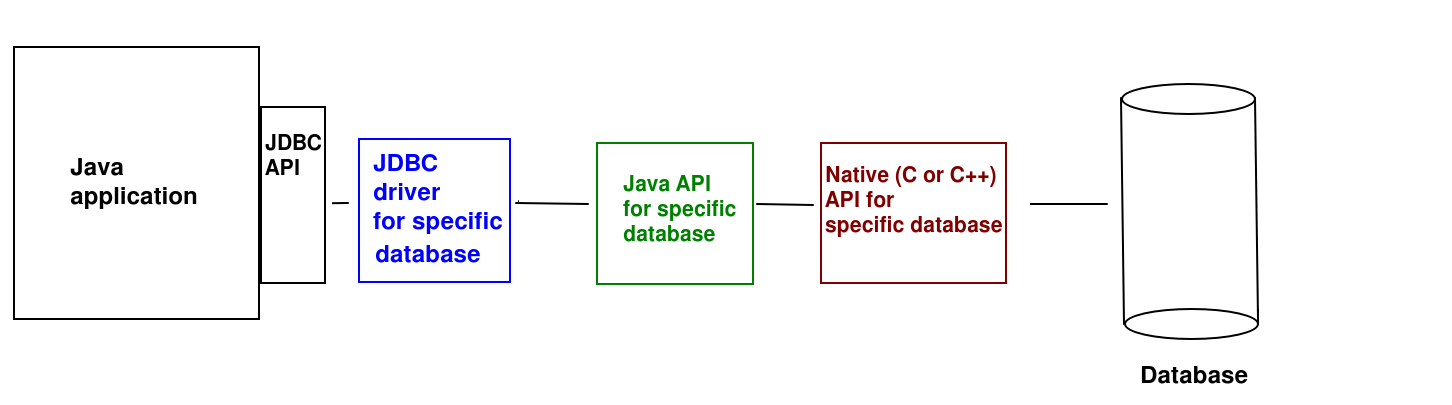
As can be seen, the JDBC API of your application (common to all databases) communicates with the driver. The driver would then typically communicate with a Java API for your specific database (e.g. SQLite) which then may use a native (C or C++) API for that database to actually communicate with the database itself - as most native database APIs are written in C or C++.
Introduction to SQLite
SQLite (see sqlite.org)
is a simple on-board client-side database which does not require a full
database management system setup (like MySQL or Oracle) and its attendant client-server architecture. SQLite databases can be easily embedded into any Java application, whether that be a web application, a console application, a desktop GUI Java application or an Android app. SQLite databases are stored as simple files, with a .db extension. You can download SQLite here. You can query and manipulate an SQLite database via the console-based sqlite3 tool, documented here and downloadable here along with the SQLite libraries. You can also upload a .db database to the online "fiddle" tool here and enter SQL statements to query and manipulate the database.
Using JDBC with SQLite
Handling exceptions
To use JDBC with any database you need to handle possible exceptions representing various type of SQL error (e.g. cannot connect to the database, SQL syntax errors). An SQLException will be thrown in all these cases. Therefore, all your database code must be placed within a try block, with a catch block to handle errors, e.g.:
Connection connection = null;
try
{
    // Connect to the database (see below)
    // Send your SQL queries (see below)
}
catch(SQLException sqlException)
{
    out.println("Error: " + sqlException);
}
finally
{
    try
    {
        if(connection != null)
        {
            connection.close();
        }
    }
    catch (SQLException closeException)
    {
        out.println("Close error: " + closeException);
    }
}
Note the try and catch is followed by a third type of block, a finally block, in which we close the database connection, whether or not there was an exception. More generally, the role of finally blocks is to run code whether or not an exception occurred. Note that closing the connection might itself generate an exception so the finally block must include its own try/catch.
Connecting to the database
First of all, use the driver to make the connection to the SQLite database:
Class.forName("org.sqlite.JDBC");
Connection conn = DriverManager.getConnection("jdbc:sqlite:C:\\Users\\yourusername\\venue.db");
The first statement (Class.forName("org.sqlite.JDBC"); ensures the driver is loaded by referencing one of the classes within it (org.sqlite.JDBC). Without this statement, the driver may not be loaded.
Then we obtain a connection to a database, using the JDBC API. All supported databases would use
DriverManager.getConnection()
as it's a standard JDBC call, however the connection details (the connection string) would be different. Note that here, the connection string is:
jdbc:sqlite:C:\\users\\yourusername\\venue.db
The jdbc: denotes the protocol, which confirms we are using JDBC. The next part of the string is the specific database we are using: sqlite here. The final part of the string is the .db file storing the database. This will be loaded from the CATALINA_BASE directory bydefault, unless a full path is specified, as it is here. Also, the .db file will be created if it doesn't already exist. Finally, note that you need to use a double-backslash to denote the Windows directory-separator backslash, as by default, backslashes are used for escape sequences, e.g. \n..
Using Statements
To use JDBC to send SQL queries to the database, we need to create Statement objects. Statement objects can be used to execute queries of various kinds. Here is an example of using a Statement to create a table using SQLite (note that the SQL used is specifically SQLite SQL, which is slightly different to other types of SQL):
Statement stmt = conn.createStatement();
stmt.executeUpdate("create table if not exists event (id integer primary key autoincrement, band string, eventdate string, eventtime string, availability integer)");
We use the Connection object to create the Statement. Statement has an executeUpdate() method to perform any query which will update the database in some way, e.g. create a table, or insert, update or delete a record. Here, we are creating a table with a primary key (id), three string columns (band, eventdate and eventtime) and an integer column (availability).
CRUD operations
CRUD (Create, Retrieve, Update, Delete) describes the standard data operations of creating data, looking up data, updating data and deleting data (in SQL, INSERT, SELECT, UPDATE and DELETE respectively). Here is how we perform CRUD operations with JDBC and SQLite.
Retrieval (SELECT statements)
Here is an example of some code to perform a SELECT statement.
String firstname = "John";
PreparedStatement pStmt = conn.prepareStatement("select * from venue where band=?");
pStmt.setString(1, request.getParameter("band"));
ResultSet rs = pStmt.executeQuery();
while(rs.next())
{
    out.println("Date: " + rs.getString("eventdate") + " Time: " + rs.getString("eventtime") + " Availability: " + rs.getString("availability") + "<br />");
}
Here is another version where we are searching on both band and date:
PreparedStatement pStmt = conn.prepareStatement("select * from venue where band=? and eventdate=?");
pStmt.setString(1, request.getParameter("band"));
pStmt.setString(2, request.getParameter("date"));
ResultSet rs = pStmt.executeQuery();
while(rs.next())
{
    out.println("Date: " + rs.getString("eventdate") + " Time: " + rs.getString("eventtime") + " Availability: " + rs.getString("availability") + "<br />");
}
Record creation (INSERT statements)
INSERT statements are fairly straightforward, here is some sample code:
PreparedStatement pStmt = conn.prepareStatement ("insert into venue(band,eventdate,eventtime,availability) values (?, ?, ?, ?)");
pStmt.setString (1, request.getParameter("band"));
pStmt.setString (2, request.getParameter("date"));
pStmt.setString (3, request.getParameter("time"));
pStmt.setInt (4, Integer.parseInt(request.getParameter("availability")));
int rowsAdded = pStmt.executeUpdate();
if(rowsAdded == 1)
{
    out.println("Successfully added");
}
else
{
    out.println("Could not add");
}
Note how it is very similar to the SELECT example, except we are now using an INSERT query and we use executeUpdate() to execute the prepared statement (we must do this for any prepared statement which changes the database in some way). We also use the return value of executeUpdate() to check how many rows were actually added, which should be 1.
Record update (UPDATE statements)
UPDATE statements are fairly straightforward, here is some sample code:
PreparedStatement pStmt = conn.prepareStatement ("update people set email=? where id=?");
pStmt.setString (1, request.getParameter("email"));
pStmt.setString (2, request.getParameter("id"));
int affectedRows = pStmt.executeUpdate();
if(affectedRows == 1)
{
    out.println("Successfully updated");
}
else
{
    out.println("Could not update");
}
This is very similar to the INSERT example. The
executeUpdate() returns the number of affected rows; we check this is 1.
Record delete (DELETE statements)
DELETE statements are identical to UPDATE in logic:
PreparedStatement pStmt = conn.prepareStatement ("delete from course where name=?");
pStmt.setString (1, request.getParameter("course"));
int affectedRows = pStmt.executeUpdate();
if(affectedRows == 1)
{
    out.println("Successfully deleted");
}
else
{
    out.println("Could not delete");
}
Data Access Objects and Data Entities
- When writing object-oriented code to interact with a database, we
typically make our code easier to read, and thus maintain, by making use of data access objects (DAOs) and
data entities. The DAO approach allows you to keep all your SQL in one place, keeping the rest of your code "cleaner" and easier to maintain.
- What are data entities and data access objects?
- A data entity is a standard Java object representing an individual entity in your table, e.g. a
Student object (from the Student class you have already written) representing a record
in a students table
- A DAO provides an interface to your table as a whole, and
might contain methods such as
findStudentById() or
findStudentsByName() (for a students table). The methods of the DAO would either return data entities or take them as parameters.
Example of a DAO for an events table (for the live music venue application)
class EventDao
{
    private Connection conn;
    private String table;

    public EventDao(Connection conn, String table)
    {
        this.conn = conn;
        this.table = table;
    }

    // find an event with a given ID

    public Event findEventById(long id) throws SQLException
    {
        PreparedStatement pStmt = conn.prepareStatement("select * from " + table + " where id=?");
        pStmt.setLong(1, id);
        ResultSet rs = pStmt.executeQuery();

        // Is there a row? If so, next() will return true
        if(rs.next())
        {
            // Create an Event object with the result
            return new Event(
                rs.getString("band"),
                rs.getString("eventdate"),
                rs.getString("eventtime"),
                rs.getInt("availability")
            );
        }
        // return null if there were no matching rows
        return null;
    }


    // find all events featuring a given band
    // returns the events as an ArrayList

    public ArrayList<Event> findEventsByBand(String band) throws SQLException
    {
        ArrayList<Event> events = new ArrayList<>();
        PreparedStatement pStmt = conn.prepareStatement("select * from " + table + " where band=?");
        pStmt.setString(1, band);
        ResultSet rs = pStmt.executeQuery();

        // Loop through the results
        while(rs.next())
        {
            // Create an Event object with each result and add it to the
            // ArrayList

            Event event = new Event(
                rs.getString("band"),
                rs.getString("eventdate"),
                rs.getString("eventtime"),
                rs.getInt("availability")
            );
            events.add(event);
        }
        return events;
    }


    // add a new event - takes an Event object (which will contain a name,
    // a course, but NOT yet an ID) as a parameter and fills
    // in the ID attribute of the Event object with the ID allocated by
    // the database. Also returns the allocated ID.

    public long addEvent(Event event) throws SQLException
    {
        PreparedStatement pStmt = conn.prepareStatement ("insert into " + table + "(band,eventdate,eventtime,availability) values (?, ?, ?, ?)");
        pStmt.setString (1, event.getBand());
        pStmt.setString (2, event.getDate());
        pStmt.setString (3, event.getTime());
        pStmt.setInt (4, event.getAvailability());
        int rowsAdded = pStmt.executeUpdate();
        long allocatedId = 0L;

        // Was a row added successfully?
        if(rowsAdded == 1)
        {
            // If so, get the keys added
            ResultSet rs = pStmt.getGeneratedKeys();

            // next() should return true, but check just in case
            if(rs.next())
            {
                // get the allocated primary key
                allocatedId = rs.getLong(1);
            }
        }

        // Add the allocated ID to the event object and return the ID
        event.setId(allocatedId);
        return allocatedId;
    }


    // update an event - takes an Event object as a parameter and updates
    // the record in the table with the ID of that event object passed in

    public int updateEvent(Event event) throws SQLException
    {
        PreparedStatement pStmt = conn.prepareStatement ("update " + table + " set date=?,time=?,availability=? where id=?");
        pStmt.setString (1, event.getDate());
        pStmt.setString (2, event.getTime());
        pStmt.setInt (3, event.getAvailability());
        pStmt.setLong (4, event.getId());
        return pStmt.executeUpdate();
    }


    // delete an event - takes an Event object as a parameter
    // and deletes the record with the ID of the event object passed in

    public int deleteEvent(Event event) throws SQLException
    {
        PreparedStatement pStmt = conn.prepareStatement ("delete from " + table + " where id=?");
        pStmt.setLong (1, event.getId());
        return pStmt.executeUpdate();
    }

    // other methods would be present, only a sample is shown...
}
DAO - Explanation
- Note how the DAO contains a series of methods which perform various
database operations
- The rest of our Java code would interface with the DAO, rather than
the database directly, keeping it clean and keeping all the SQL
statements in one place. For example, your other classes would call the DAO's
findEventById() method to find an event using its ID, rather than via a direct SQL INSERT statement. This also means the rest of your code, outside the DAO, is pure Java, rather than a mixture of Java and SQL.
- Many of the methods contain an Event object as a parameter; the DAO
will take this event object and perform the appropriate operation using
the data contained within it
- e.g. the
updateEvent() method will update the details of
the event with the ID specified in the event object, to the details
contained within the event object
- Note also how all the methods include the instruction
throws SQLException. All these methods might throw an exception because all contain SQL statements. However, rather than handling the exceptions here, we re-throw them to whatever code might be calling the DAO. This allows for custom error handling depending on what UI we are using: the idea is that the UI will contain the try/catch statement and handle the exceptions in an appropriate way by displaying a message to the user with that UI.
Using the DAO from outside - simple
Just create the DAO from your JSP, e.g. as follows:
Connection conn = null;
try
{
    // Connect to database
    Class.forName("org.sqlite.JDBC");
    conn = DriverManager.getConnection("jdbc:sqlite:C:\\Users\\yourusername\\venue.db");

    // Create the DAO
    EventDao dao = new EventDao(conn, "event");

    // Find all events by the user's chosen band
    ArrayList<Event> events = dao.findEventsByBand(request.getParameter("band"));

    // Display each event
    for(Event e: events)
    {
        out.println(e.getDate() + " " + e.getTime());
    }
    // ... etc ...
Using the DAO from outside - more complex
A typical design would include a "manager" class (such as the LiveMusicVenue in this example) containing multiple DAOs. For example:
public class LiveMusicVenue
{
    private Connection conn;
    private EventDao eventDao;
    private CustomerDao customerDao;

    public LiveMusicVenue(Connection conn) throws SQLException
    {
        this.conn = conn;
        eventDao = new EventDao(conn, "event");
        customerDao = new CustomerDao(conn, "customer");
    }

    public ArrayList<Event> findEventsByBand(String band) throws SQLException
    {
        return eventDao.findEventsByBand(band);
    }

    public boolean bookEvent(long eventId, long customerId, int nPeople) throws SQLException
    {
        Event event = eventDao.findEventById(eventId);
        Customer customer = customerDao.findCustomerById(customerId);

        if(event.getAvailability() >= nPeople)
        {
            Booking booking = new Booking(event, nPeople);
            event.reduceAvailability(nPeople);
            eventDao.updateEvent(event);
            customer.addBooking(booking);
            return true;
        }
        return false;
    }

    // ... etc ...
}
Note how the
LiveMusicVenue contains multiple DAOs and provides methods which allow the outside world to communicate with the DAOs (e.g.
findEventsByBand(), shown here).
Note also the bookEvent() method, which takes an event ID and customer ID as parameters. This shows how one event can communicate with multiple DAOs. We use the DAOs to find the event and customer with those IDs, and then, if the event has free space, we create a booking for the event, reduce the availability in the event object, pass the event object to the DAO via the updateEvent() method (so that the availability in the database updates), and add the booking to the customer. The latter operation would not change the database but just store a booking locally within the customer object, as it is not a long-term operation and therefore does not need database storage.
Exercise
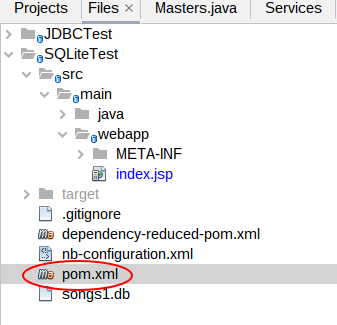
You will need to modify the pom.xml file (Maven build file) to include the Xerial SQLite JDBC driver (see here) in your project. Create a new Web project in NetBeans. Open your pom.xml (see below):
Delete the <dependencies> and <build> sections completely, and replace them with the code below:
 <dependencies>
        <dependency>
            <groupId>javax</groupId>
            <artifactId>javaee-web-api</artifactId>
            <version>7.0</version>
            <scope>provided</scope>
        </dependency>
        <!-- from sqlite -->
         <dependency>
            <groupId>org.xerial</groupId>
            <artifactId>sqlite-jdbc</artifactId>
            <version>3.39.2.0</version>
           <!-- <scope>provided</scope>-->
        </dependency>
    </dependencies>

    <build>
        <plugins>
            <plugin>
                <groupId>org.apache.maven.plugins</groupId>
                <artifactId>maven-compiler-plugin</artifactId>
                <version>3.1</version>
                <configuration>
                    <source>1.7</source>
                    <target>1.7</target>
                    <compilerArguments>
                        <endorseddirs>${endorsed.dir}</endorseddirs>
                    </compilerArguments>
                </configuration>
            </plugin>
            <plugin>
                <groupId>org.apache.maven.plugins</groupId>
                <artifactId>maven-war-plugin</artifactId>
                <version>3.3.1</version>
                <configuration>
                    <failOnMissingWebXml>false</failOnMissingWebXml>
                </configuration>
            </plugin>
            <plugin>
                <groupId>org.apache.maven.plugins</groupId>
                <artifactId>maven-dependency-plugin</artifactId>
                <version>2.6</version>
                <executions>
                    <execution>
                        <phase>validate</phase>
                        <goals>
                            <goal>copy</goal>
                        </goals>
                        <configuration>
                            <outputDirectory>${endorsed.dir}</outputDirectory>
                            <silent>true</silent>
                            <artifactItems>
                                <artifactItem>
                                    <groupId>javax</groupId>
                                    <artifactId>javaee-endorsed-api</artifactId>
                                    <version>7.0</version>
                                    <type>jar</type>
                                </artifactItem>
                            </artifactItems>
                        </configuration>
                    </execution>
                </executions>
            </plugin>
            <!-- from sqlite-->
             <plugin>
        <groupId>org.apache.maven.plugins</groupId>
        <artifactId>maven-shade-plugin</artifactId>
        <version>3.3.0</version>
        <executions>
          <execution>
            <goals>
              <goal>shade</goal>
            </goals>
            <configuration>
              <transformers>
                <transformer
                    implementation="org.apache.maven.plugins.shade.resource.AppendingTransformer">
                    <resource>META-INF/services/java.sql.Driver</resource>
                </transformer>
              </transformers>
            </configuration>
          </execution>
        </executions>
      </plugin>
        </plugins>
    </build>
Now you can start developing the project:
- Note that you will need to import the various JDBC classes. They are all in the
java.sql package, e.g. java.sql.Connection or java.sql.SQLException.
- Copy the
index.html from week 5 to it (this contains a form allowing the user to add a student), and also add this additional form, allowing the user to search for a student by name:
<form method="get" action="search.jsp">
Student name: <input name="studentName" />
<input type="submit" value="Go!" />
</form>
- Create a new JSP,
addStudent.jsp. In this JSP, add code to connect to the database. Begin with the try/catch/finally structure shown above and then add the connection code. Use the filename students.db for your SQLite database. This file will be created if it doesn't exist already.
- Add code to read in the student details from the form. Use an
INSERT statement to add a new student record to a student table in the database. You'll need to create the table if it doesn't already exist. Test the number of affected rows returned, to confirm to the user whether the insertion was successful or not.
- Create a second JSP,
search.jsp. This should read in the student name from the second form on the index page, and use it to search for all students with that name. Display all matching students.
- Create a
StudentDao by following the DAO example above. It should include methods to add a student and search for a student by name. Modify your JSPs so that they create a StudentDao object and use it to perform the insertion and search operations.
- Advanced: Modify your University console application from week 3 so that it stores students in an SQLite database rather than an array list. It should include the
StudentDao you wrote above. You will need to modify the StudentDao and the University in this way:
- Include
findStudentById() and findStudentsByName() methods in the DAO. These should query the database appropriately and return a single Student, and an ArrayList of matching Students, respectively.
- The
University should contain a StudentDao within it, but it will no longer need an ArrayList of students.
- Modify the methods of
University so that they call the appropriate methods in the StudentDao.