In this week's topic you will be introduced to the concept of web APIs. You will get an initial idea of why they are useful, and will start to write a simple web API using Java using Jersey.
Think about the work you did last year in Web Technologies, in which you wrote a simple Node/Express server to search a database table and display the results using EJS. You generated HTML as the output format, so that the results look good in a browser.
The problem with HTML, however, is that it is a format specific to a browser. This is fine if we are simply writing a website to be viewed by an end-user in a browser. But the end-user is not the only potential user of the data. Other applications might want to make use of the content, for example a weather app running on Android or iOS might want to access weather forecasts from a weather website. Apps do not typically use HTML, they use their own user interface, so it would be better if our server delivered the data as raw data, without any presentation or formatting. An example of a raw data format is JSON, which you saw last year in COM419. Raw data could then be easily processed by any front end, for example:
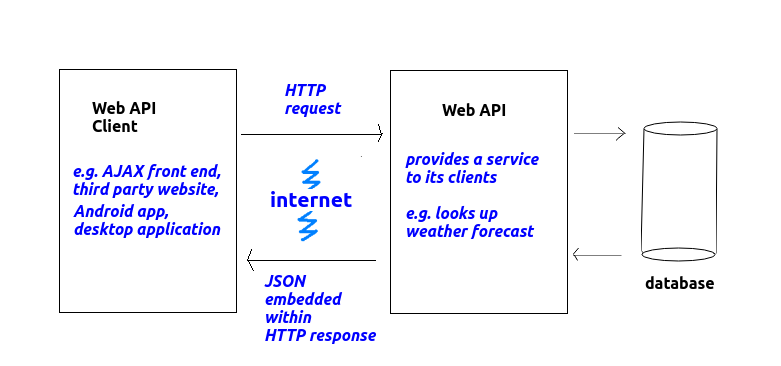
A web service is an application running on a web server which provides raw data (such as JSON) to other applications (client applications), as we saw above. Web servics receive HTTP requests, via a collection of URLs known as a web API (Application Programming Interface), from clients, process the request, and deliver the response back as an HTTP response - but unlike the simple servers you saw last year, the response is delivered as raw data, rather than HTML. This is shown on the diagram below:
Here are a few examples of web APIs and their clients:
Web APIs obviously send back information to their clients, but as we have seen, a raw data format such as JSON is preferred to HTML. Why is this? HTML is not considered a good idea because it contains not only data, but also page structure information (headings, paragraphs, tables etc). A client website using the web API, or an app, might wish to arrange the information in a different way.
So what we want is a format which represents the data, and the data alone. There are a number of formats we can use, including JSON (JavaScript Object Notation), and also XML (eXtensible Markup Language). In this module we will focus on JSON, because it's the leading format, it is easy to generate on the server and to parse (interpret) on the client, and you have met it already.
JSON uses JavaScript syntax (hence the name) to represent data as it gets sent across the web. As you saw last year, JavaScript uses curly brackets {} to represent objects (similar to Python dictionaries in the sense that they consist of key/value pairs, though you can also add methods to objects) and square brackets [] to represent arrays. So with JSON we reuse this syntax to represent data, using curly brackets {} to represent a single entity (such as a person, a song or a film) and square brackets [] to represent a collection of entities (i.e. an array of entities).
Here is an example of a JSON object representing a single student.
{
    "name": "Tim Smith",
    "username": "2smitt82",
    "course": "Computer Studies"
}
Note how the JSON object representing the student is defined by curly brackets { and }, and inside the curly bracket, we specify each property of the student (name, username and course) and the corresponding value ("Tim Smith", "2smitt82", and "Computer Studies", respectively). A colon (:)
separates the property and the value, and a comma separates each property/value pair.
The next example shows a collection (array) of students. Note how we use the JSON array syntax [ and ] to define the collection, how each individual student object is represented by curly brackets { and }, and how each student object within the array is separated by a comma.
[
    {
      "name": "Tim Smith",
      "username": "2smitt82",
      "course": "Computer Studies"
    },

    {
      "name": "Jamie Bailey",
      "username": "1bailj39",
      "course": "Computer Studies"
    },

    {
      "name": "Deep Patel",
      "username": "0pated61",
      "course": "Networks and Web Design"
    }
]
There are various libraries available for creating web APIs in Java. There is a published Java specification for web APIs called JAX-RS (see here. This specification defines a set of classes and methods for implementing web APIs, but is not an actual library of code that you can include in your project. Various libraries implement the JAX-RS specification, and one example of a library which does so is Jersey.
We can setup a Jersey service in two ways:
Use this pom.xml which includes the Jersey dependencies:
<?xml version="1.0" encoding="UTF-8"?>
<project xmlns="http://maven.apache.org/POM/4.0.0" xmlns:xsi="http://www.w3.org/2001/XMLSchema-instance" xsi:schemaLocation="http://maven.apache.org/POM/4.0.0 http://maven.apache.org/xsd/maven-4.0.0.xsd">
    <modelVersion>4.0.0</modelVersion>

    <groupId>com.example</groupId>
    <!-- replace jersey-tomcat with your project name -->
    <artifactId>jersey-tomcat</artifactId>
    <version>1.0-SNAPSHOT</version>
    <packaging>war</packaging>

    <!-- replace jersey-tomcat with your project name -->
    <name>jersey-tomcat</name>


    <properties>
        <endorsed.dir>${project.build.directory}/endorsed</endorsed.dir>
        <project.build.sourceEncoding>UTF-8</project.build.sourceEncoding>
        <jersey.version>2.37</jersey.version>
    </properties>

      <dependencyManagement>
        <dependencies>
            <dependency>
                <groupId>org.glassfish.jersey</groupId>
                <artifactId>jersey-bom</artifactId>
                <version>2.37</version>
                <type>pom</type>
                <scope>import</scope>
            </dependency>
        </dependencies>
    </dependencyManagement>


    <dependencies>
        <dependency>
            <groupId>javax</groupId>
            <artifactId>javaee-web-api</artifactId>
            <version>7.0</version>
            <scope>provided</scope>
        </dependency>
        <dependency>
            <groupId>org.glassfish.jersey.inject</groupId>
            <artifactId>jersey-hk2</artifactId>
        </dependency>

         <dependency>
            <groupId>org.glassfish.jersey.containers</groupId>
            <artifactId>jersey-container-servlet</artifactId>
        </dependency>
        <dependency>
            <groupId>org.glassfish.jersey.media</groupId>
            <artifactId>jersey-media-json-jackson</artifactId>
        </dependency>
    </dependencies>

    <build>
        <plugins>
            <plugin>
                <groupId>org.apache.maven.plugins</groupId>
                <artifactId>maven-compiler-plugin</artifactId>
                <version>3.1</version>
                <configuration>
                    <source>1.7</source>
                    <target>1.7</target>
                    <compilerArguments>
                        <endorseddirs>${endorsed.dir}</endorseddirs>
                    </compilerArguments>
                </configuration>
            </plugin>
            <plugin>
                <groupId>org.apache.maven.plugins</groupId>
                <artifactId>maven-war-plugin</artifactId>
                <version>2.3</version>
                <configuration>
                    <failOnMissingWebXml>false</failOnMissingWebXml>
                </configuration>
            </plugin>
            <plugin>
                <groupId>org.apache.maven.plugins</groupId>
                <artifactId>maven-dependency-plugin</artifactId>
                <version>2.6</version>
                <executions>
                    <execution>
                        <phase>validate</phase>
                        <goals>
                            <goal>copy</goal>
                        </goals>
                        <configuration>
                            <outputDirectory>${endorsed.dir}</outputDirectory>
                            <silent>true</silent>
                            <artifactItems>
                                <artifactItem>
                                    <groupId>javax</groupId>
                                    <artifactId>javaee-endorsed-api</artifactId>
                                    <version>7.0</version>
                                    <type>jar</type>
                                </artifactItem>
                            </artifactItems>
                        </configuration>
                    </execution>
                </executions>
            </plugin>
        </plugins>
    </build>
</project>
The web.xml file is an additional file that must be added to your project. This tells Tomcat where to find the classes making up your service. Here is an example, taken from the example on Vogella and modified:
<?xml version="1.0" encoding="UTF-8"?>
<web-app xmlns:xsi="http://www.w3.org/2001/XMLSchema-instance" xmlns="http://java.sun.com/xml/ns/javaee" xsi:schemaLocation="http://java.sun.com/xml/ns/javaee http://java.sun.com/xml/ns/javaee/web-app_3_0.xsd" id="WebApp_ID" version="3.0">
  <display-name>com.example.jersey.tomcat</display-name>
 <servlet>
    <servlet-name>Jersey REST Service</servlet-name>
    <servlet-class>org.glassfish.jersey.servlet.ServletContainer</servlet-class>
     <!-- Register resources and providers under stated package. -->
    <init-param>
        <param-name>jersey.config.server.provider.packages</param-name>
        <param-value>com.example.jersey.tomcat</param-value>
    </init-param>
    <load-on-startup>1</load-on-startup>
  </servlet>
  <servlet-mapping>
    <servlet-name>Jersey REST Service</servlet-name>
    <url-pattern>/api/*</url-pattern>
  </servlet-mapping>
</web-app>
The majority of this you can use unchanged, but note the highlighted sections.
com.example.jersey.tomcat refers to the package containing the classes making up your service. An example of a service class is shown below./api/* refers to the URL path which will trigger the service. So here, any path beginning with /api, i.e. http://localhost:8080/app-name/api/... will be handled by your service.In the service class we setup methods to handle routes. A route is a URL relative to the root of the server, e.g: the route allStudents would run in response to a request to http://localhost:8082/allStudents.
Each route-handling method is specified by a Java annotation and also labelled with a further annotation which specifies which HTTP method (GET, POST etc) will trigger it. We also specify the type of data we are sending back with the @Produces annotation. An example is below, which was partly auto-generated by Maven as above:
package com.example.jersey.tomcat;

import javax.ws.rs.Consumes;
import javax.ws.rs.GET;
import javax.ws.rs.POST;
import javax.ws.rs.Path;
import javax.ws.rs.PathParam;
import javax.ws.rs.Produces;
import javax.ws.rs.core.MediaType;
import javax.ws.rs.core.Response;
import java.util.ArrayList;

@Path("routes")
public class MyAPI {

    @GET
    @Produces(MediaType.TEXT_PLAIN)
    public String helloWorld() {
        return "Hello World!";
    }

    @GET
    @Path("/html")
    @Produces(MediaType.TEXT_HTML)
    public String helloHtml() {
        return "<h1>Hello HTML!</h1>";
    }
}
Note the @Path annotation at the start. This is the URL path which will trigger the methods inside this class. So any path beginning with /api/routes (api from the web.xml as above), i.e.:
http://localhost:8080/app-name/api/routes/...will be processed by methods in this class.
The class contains two methods: helloWorld() and helloHtml(). Each is preceded by an HTTP method annotation (@GET or @POST, typically), a path which the method maps to (e.g. @Path("/html")), and a @Produces annotation (which describes the content type the method is producing, e.g. plain text, HTML or JSON). The method itself follows, which will be executed by the service in response to a request. Note how the methods return the data which will be returned by the server within an HTTP response.
Note that the helloWorld() method contains no @Path. This means this will run in response to a request to the "root" of the /api path, i.e. http://localhost:8080/app-name/api/routes.
The second method helloHtml() has a @Path of /html, meaning it will run in response to a request to http://localhost:8082/api/html.
We can specify parameters in the URL for each route. Here is an example of a route handler which counts from 1 to a given number, supplied as a parameter:
@Path("api")
class MyAPI {
    // Other routes not shown...

    @GET
    @Path("/countTo/{count}")
    @Produces(MediaType.TEXT_HTML)
    public String countTo(@PathParam("count") int count) {
        String html = "";
        for(int i=1; i<=count; i++) {
            html += i + "
";
        }
        return html;
    }
}
Note how the route is countTo/{count}, which means the route handler will handle any requests for api/countTo plus a parameter {count} - for example:
http://localhost:8080/app-name/api/routes/countTo/3
http://localhost:8080/app-name/api/routes/countTo/10
Note how the route-handler method (
countTo()) now takes a parameter (int count), but that parameter is annotated with @PathParam("count") which specifies that the integer count will be read from the {count} parameter within the URL. The method then creates an HTML string containing the numbers 1 to the specified parameter, separated by a line break, and returns it to the client.
As seen above, a web API will commonly need to generate JSON. To do this we use the Jackson JSON library (see here), which automatically maps Java objects to JSON data. So if you have an Event class containing band, date and availability attributes, Jackson will generate JSON from Event objects containing these three properties. Likewise, Jackson can consume (read) JSON containing these three properties and generate an Event object from it.
Here is an example of a method which generates JSON:
    @GET
    @Path("/json")
    @Produces(MediaType.APPLICATION_JSON)
    public Event json() {
        Event event = new Event("Postmodern Doom", "Indie Rock", "01/04/2023");
        return event;
    }
We can also return array lists of data as JSON easily:
    @GET
    @Path("/multiJson")
    @Produces(MediaType.APPLICATION_JSON)
    public ArrayList<Event> multiJson() {
        ArrayList<Event> events = new ArrayList<>();
        Event event = new Event("Postmodern Doom", "01/04/2023");
        Event event2 = new Event("Metagalactic Hamstaaz", "02/04/2023");
        events.add(event);
        events.add(event2);
        return events;
    }
Finally a service can consume (read and use) JSON. Here is an example:
    @POST
    @Path("/json")
    @Consumes(MediaType.APPLICATION_JSON)
    @Produces(MediaType.TEXT_HTML)
    public String postJson(Event event)
    {
        return "Band: " + event.getBand() + " Date: " + event.getDate() + " Availability: " + event.getAvailability();
    }
Note this method @Consumes JSON. If we pass JSON representing an event, with the fields in the JSON corresponding to the attributes in the Event class, Jackson will automatically generate an Event object from the JSON and pass it to the method as a parameter. Here we are just testing that it's worked by sending back the data within the event to the client as HTML.
If Tomcat does not work on your system, an alternative is to use Grizzly. Grizzly is an HTTP web server which can be embedded in an application.
Please use a pom.xml similar to that below, again this contains the Jersey dependencies.
<project xmlns="http://maven.apache.org/POM/4.0.0" xmlns:xsi="http://www.w3.org/2001/XMLSchema-instance"
         xsi:schemaLocation="http://maven.apache.org/POM/4.0.0 http://maven.apache.org/maven-v4_0_0.xsd">

    <modelVersion>4.0.0</modelVersion>

    <groupId>com.example</groupId>
    <!-- replace simple-service with your project name -->
    <artifactId>simple-service</artifactId>
    <packaging>jar</packaging>
    <version>1.0-SNAPSHOT</version>
    <!-- replace simple-service with your project name -->
    <name>simple-service</name>

    <dependencyManagement>
        <dependencies>
            <dependency>
                <groupId>org.glassfish.jersey</groupId>
                <artifactId>jersey-bom</artifactId>
                <version>2.37</version>
                <type>pom</type>
                <scope>import</scope>
            </dependency>
        </dependencies>
    </dependencyManagement>

    <dependencies>
        <dependency>
            <groupId>org.glassfish.jersey.containers</groupId>
            <artifactId>jersey-container-grizzly2-http</artifactId>
        </dependency>
        <dependency>
            <groupId>org.glassfish.jersey.inject</groupId>
            <artifactId>jersey-hk2</artifactId>
        </dependency>

        <dependency>
            <groupId>org.glassfish.jersey.media</groupId>
            <artifactId>jersey-media-json-jackson</artifactId>
        </dependency>

        <!-- uncomment this to get JSON support:
         <dependency>
            <groupId>org.glassfish.jersey.media</groupId>
            <artifactId>jersey-media-json-binding</artifactId>
        </dependency>
        -->
        <dependency>
            <groupId>junit</groupId>
            <artifactId>junit</artifactId>
            <version>4.12</version>
            <scope>test</scope>
        </dependency>
    </dependencies>

    <build>
        <plugins>
            <plugin>
                <groupId>org.apache.maven.plugins</groupId>
                <artifactId>maven-compiler-plugin</artifactId>
                <version>3.8.1</version>
                <inherited>true</inherited>
                <configuration>
                    <source>1.8</source>
                    <target>1.8</target>
                </configuration>
            </plugin>
            <plugin>
                <groupId>org.codehaus.mojo</groupId>
                <artifactId>exec-maven-plugin</artifactId>
                <version>1.2.1</version>
                <executions>
                    <execution>
                        <goals>
                            <goal>java</goal>
                        </goals>
                    </execution>
                </executions>
                <configuration>
                    <mainClass>com.example.Main</mainClass>
                </configuration>
            </plugin>
        </plugins>
    </build>

    <properties>
        <jersey.version>2.37</jersey.version>
        <project.build.sourceEncoding>UTF-8</project.build.sourceEncoding>
    </properties>
</project>
The Grizzly server is implemented with a main class; note that the example code below is auto-generated by Maven, which has the facility to create a starter Jersey project for you. Details in the Jersey documentation.
package com.example.jersey.grizzly;

import org.glassfish.grizzly.http.server.HttpServer;
import org.glassfish.jersey.grizzly2.httpserver.GrizzlyHttpServerFactory;
import org.glassfish.jersey.server.ResourceConfig;

import java.io.IOException;
import java.net.URI;

/**
 * Main class.
 *
 */
public class Main {
    // Base URI the Grizzly HTTP server will listen on
    public static final String BASE_URI = "http://localhost:8082/";

    /**
     * Starts Grizzly HTTP server exposing JAX-RS resources defined in this application.
     * @return Grizzly HTTP server.
     */
    public static HttpServer startServer() {
        // create a resource config that scans for JAX-RS resources and providers
        // in com.example.simpleservice package
        final ResourceConfig rc = new ResourceConfig().packages("com.example.jersey.grizzly");

         // create and start a new instance of grizzly http server
        // exposing the Jersey application at BASE_URI
        HttpServer server =  GrizzlyHttpServerFactory.createHttpServer(URI.create(BASE_URI), rc);

        // Setup a folder to contain static web pages
        StaticHttpHandler staticHttpHandler = new StaticHttpHandler("C:/users/MyUser/webpages");

        // Routes starting with /static will be handled by retrieving the requested HTML page from the static pages folder
        server.getServerConfiguration().addHttpHandler(staticHttpHandler, "/static");

        return server;
    }

    /**
     * Main method.
     * @param args
     * @throws IOException
     */
    public static void main(String[] args) throws IOException {
        final HttpServer server = startServer();
        System.out.println(String.format("Jersey app started with endpoints available at "
                + "%s%nHit Ctrl-C to stop it...", BASE_URI));
        System.in.read();
        server.stop();
    }
}
Hopefully you can see what is going on here from the comments (auto-generated by Maven).
main(), we start a server with the startServer() method. This will start a server running on port 8082 until it's stopped by the user. Note this server is separate to Tomcat.startServer() method we create a ResourceConfig object. This specifies which package the service classes (see above under Tomcat discussion) can be found, in a similar way to Tomcat's web.xml. Here we are specifying they will be in the com.example.jersey.grizzly package. The service code will be autoloaded from classes in this package, and the Grizzly server will serve them to the client.api path (from the web.xml file) specified this time, e.g.:
http://localhost:8082/routes/html
http://localhost:8082/routes/countTo/3
http://localhost:8082/routes/json
Typically, in web development, we would use JavaScript code to send requests to a service, and to interpret the JSON returned. (Or, in an Android app, we would use Android API code to do this). However this is rather off-topic for this module so I have provided a library to make this simple, which you can insert into an HTML page with very minimal JavaScript.
The file webapi.js provides this library, you can obtain it from GitHub at the URL https://github.com/nwcourses/autoajax. It consists of just one file, webapi.js. Here is an example of using it. Note the comments provided in the code to explain how it works.
<!DOCTYPE html>
<html>
<head>
<!-- link in the webapi.js file -->
<script type='text/javascript' src='webapi.js'></script>
<script>

function function1() {
    // The get() function takes three arguments:
    // - the URL of the web API route you are communicating with;
    // - the field names for the data in the JSON;
    // - the ID of the HTML <div> to place the results in. A table will be created and placed in this <div>.
    get(
        'http://localhost:8082/routes/json',
        ["name","course","mark"],
        "results"
    );
}

function function2() {
    // The post() function is designed to take data from input boxes and send it
    // to the server. takes three arguments:
    // - the URL of the web API route you are communicating with;
    // - the IDs of the form fields containing the data to send.
    //   Note that these must exactly match the attributes in the object that
    //   your POST route in your service receives.
    // - the ID of the HTML <div> to place the response in
    post(
        'http://localhost:8082/routes/json',
        ["name", "course", "mark"],
        "results"
    );
}
</script>
</head>
<body>
<!-- Form containing fields for data to be sent via the POST request -->
<div>
Name: <br /><input id='name' /><br />
Course: <br /><input id='course' /><br />
Mark: <br /><input id='mark' /><br />
</div>
<!-- Setup two buttons which call the appropriate JavaScript functions when they are clicked -->
<input type='button' name='Get Data' value='get' onclick='function1()' />
<input type='button' name='Post Data' value='post' onclick='function2()' />
</div>
<!-- div containing the results from the server -->
<div id='results'></div>
</body>
</html>
One question remains. How can you test out these methods? With GET methods, it's simple (we did it last week); you simply request the desired API endpoint in your browser and the appropriate route will be executed. However, with other methods, such as POST and DELETE, it's more difficult, as browsers always send GET requests when you type in a URL.
There are various third-party tools which can be used to test out APIs. A particularly useful one, which those of you on Craig's OODD will have already been introduced to, is RESTer. This is a browser extension which allows you to simulate HTTP requests and is available for Chrome and Firefox. To install RESTer, visit either of these links and follow the instructions, and RESTer will be installed to your browser.
RESTer has an interface as shown below:
Note how RESTer allows you to specify, amongst other things:
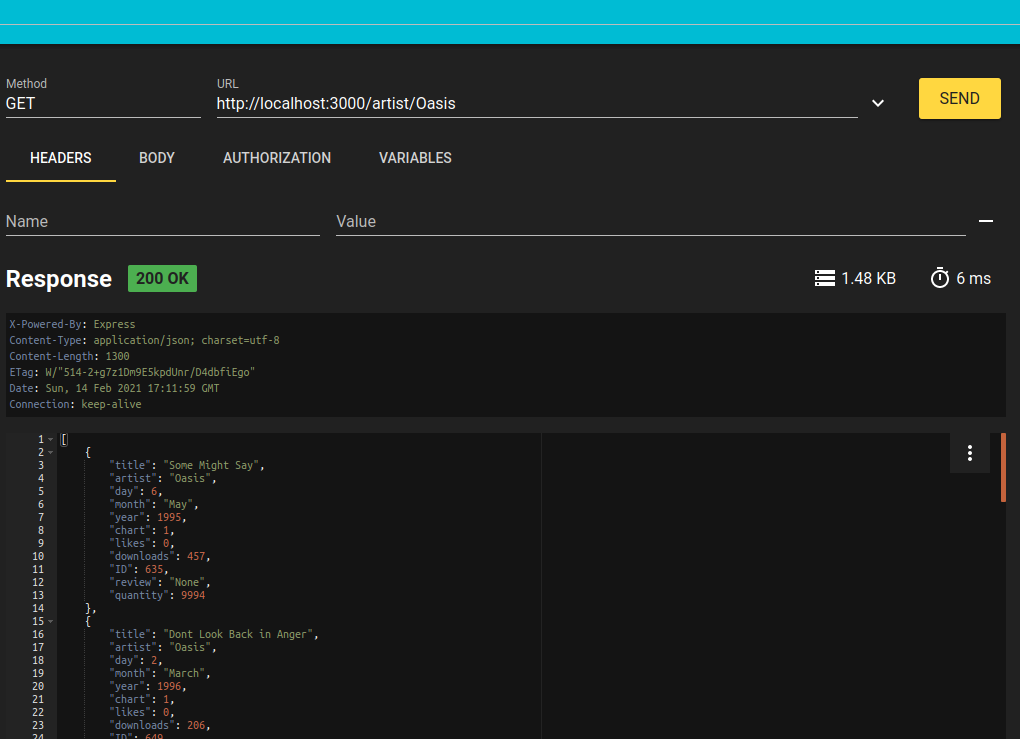
https://url_of_your_server.example.com/artist/Oasis. Note how the response is shown below the controls, showing the status code, the response headers and the response body.
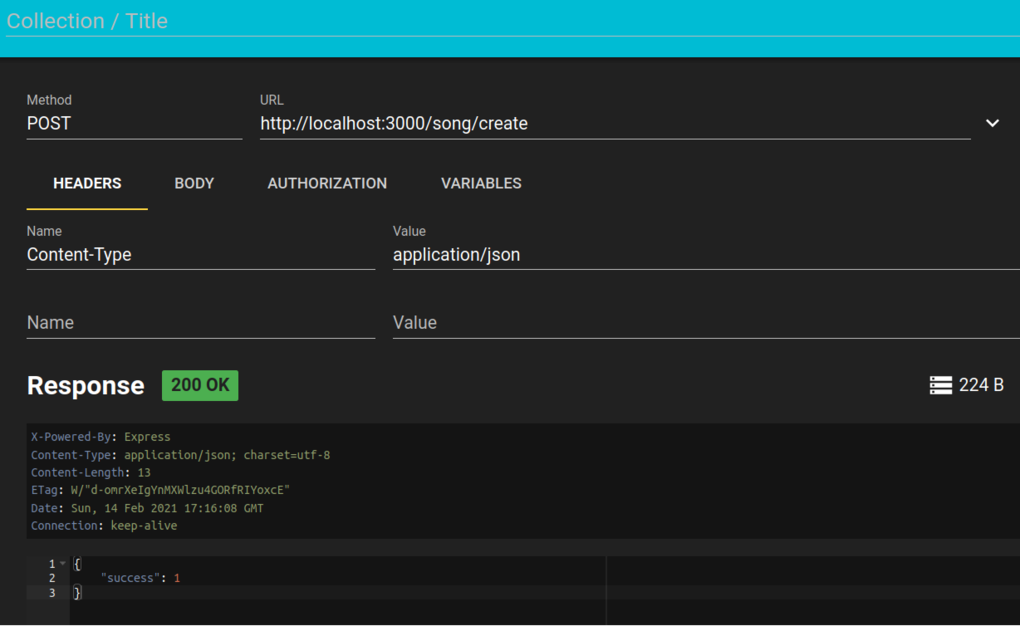
The screenshot below shows how you can add headers to the HTTP request by selecting the Headers tab. Here we have specified the Content-Type as application/json:
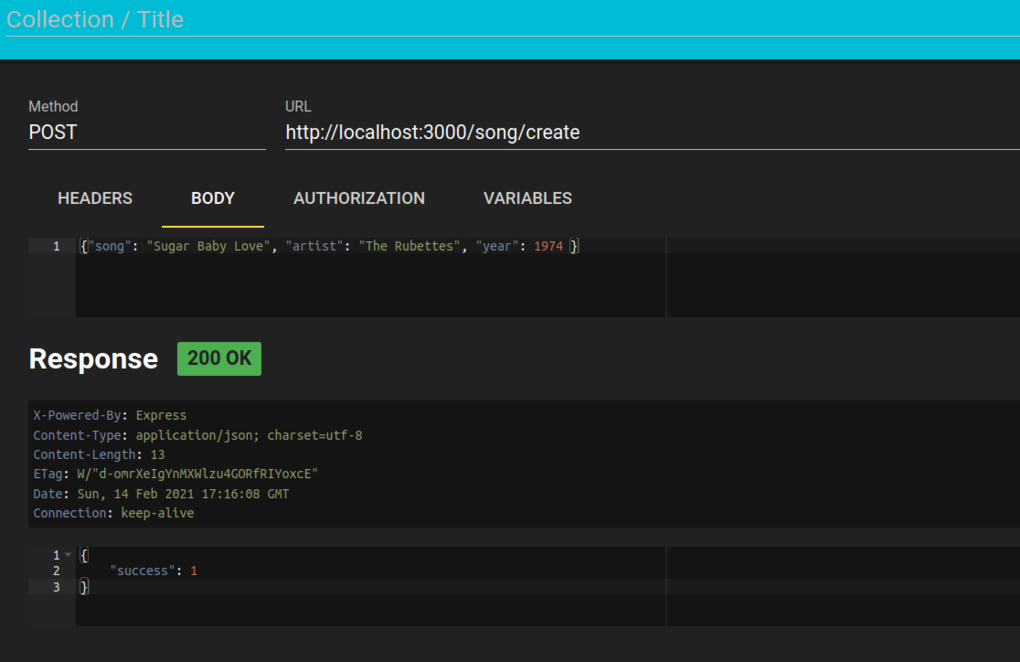
You can also add data to the request body. This is shown below, note how we have added JSON describing a song. (Prize to anyone who can guess why I have chosen this particular song...)
RESTer also allows you to test error conditions: if you supply invalid
request data and your web API checks for this, then you will get a non-200
status code returned.
Please note there are template projects available here for Tomcat and Grizzly respectively. Please use these as they have pom.xml, plus web.xml or the main class, set up already:
https://github.com/nwcourses/jersey-tomcat-template
https://github.com/nwcourses/jersey-grizzly-template