This week we will look at a few more Web API-related topics, including:
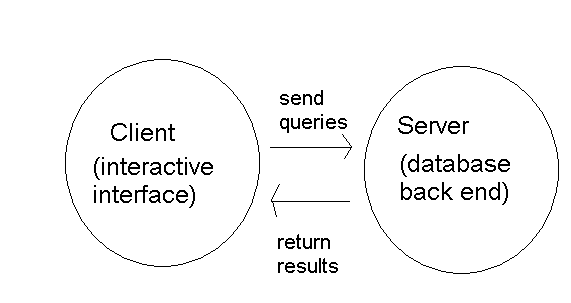
We are using SQLite in this module. However in production web applications, you typically use a full database server, such as MySQL or Oracle. We will not be using a database server in this module, but it's helpful to be clear of their architecture as you will likely work with it in a production app. Server-based database systems consist of two components, the server and
the client:
A database server is what we refer to when we informally use the term "database software". It is a continuously-running program which listens to SQL queries from clients, processes them and sends back a response; in this respect, a database server is just like any other server, including a web server.
Examples of database servers include:
Users do not typically interact directly with the database server. Instead, they interact with a database client - a piece of software which communicates with the database server by connecting to it, sending SQL queries, and processing the response. When developing web applications, your software (for example, your Node.js server) would act as the database client. Additionally, a wide range of administration software for database servers is available, allowing developers to control the database via a user-friendly interface. These include:
mysql command line tool (command-prompt-based interface to MySQL)Database-driven web applications adopt a three-tier architecture. This is because there are three layers: web browser (which the user interacts with), web server (e.g. Node.js or Apache/PHP), and database server.
The web server acts as the server with respect to the
user's web browser, but the client with respect to the database server:
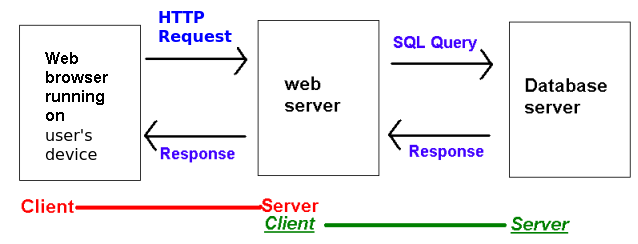
The general steps made by a web server application when connecting to a database server are:
We started to look at Representational State Transfer, or REST, last week - but this week we will discuss it in more detail. REST is not a technology, but an architecture for web APIs. The idea centres around using clear, highly-descriptive URLs to represent each real-world entity that our web application needs to deal with (e.g. a song, a list of all songs by a given artist, a flight, a biography of an actor, etc). For example we could have these URLs:
http://www.hittastic.com/artist/Oasis
http://www.hittastic.com/biography/Madonna
http://www.solentairways.com/flight/SA101
http://www.solentairways.com/flights/June/1/Southampton/New_York
In REST, these URLs are called resources. REST has the following key principles:
A key principle of REST, illustrated by the examples above, is that of clean, unchanging URLs. Why is this useful? URLs which show the real location on the server, or the server-side technology used (e.g. the fact that it's a PHP script) are prone to continuous change, for example, if the script is moved to a different directory or we switch server-side scripting technology. This causes problems in bookmarking and linking to such pages, and also, if the URLs represent web APIs, means that developers of client applications have to update their client code to point to the new URL.
With REST, we hide the implementation details with a simple, clean and easily-remembered URL, and define how this URL is mapped to the real, underlying location of the script on the server. For example, rather than a style (which should be familiar from OODD) such as
http://www.hittastic.com/searchForMusic.jsp?title=Wonderwall&artist=Oasiswe could use:
http://www.hittastic.com/Oasis/WonderwallThe web server software would convert this REST-style URL to the real, underlying script.
If we changed the underlying URL, i.e. the location of the actual server side script on the server, all we'd need to do is change the mapping of our clean, easily remembered, publicly-visible, "REST-style" URL to the real underlying URL, and clients of the web API could continue to use our web API unchanged with the same publicly-visible URL as before; they wouldn't have to alter their code to reflect the new underlying URL. We could even change the server-side implementation technology (e.g. JSP to Node.js) without having to change the publicly-visible URL: once again we would only have to change the mapping from the publicly-visible URL to the underlying URL.
Furthermore, this allows us to easily swap between dynamically and statically generated data. Imagine the URL below points at a static (i.e. not dynamically generated) JSON file on the server representing all Oasis hits.
http://www.hittastic.com/artist/OasisBy changing the server configuration, we could easily change this URL to point to a server side script which dynamically generates the data from a database. So in summary, REST style URLs provide a clean and unchanging interface to data supplied by our server and there is no need to change the URL depending on how the data associated with that URL is generated.
The practical details of how to actually set up REST-style URLs to point to given scripts will be discussed towards the end of this week's notes.
With REST, we send different types of messages to the same URL to make it do different things, e.g. retrieve data or change the state of the item represented by the URL. For example if we had the URL:
http://www.solentairways.com/flight/SA101we could send one type of message (let's call it a "get" message) to to the URL to retrieve the details about flight SA101, and another type of message (let's call it a "put" message) to update the details (e.g. departure time) of flight SA101, and a third type (let's call it a "delete" message) to delete flight SA101.
But what form do these messages take? We could use query string parameters to inform the script of the message type. However, like custom error codes, this could be seen as reinventing the wheel. Last week we looked at HTTP methods and encountered the recommendation to send GET requests when retrieving data, POST requests when adding, or PUT requests (see below) for modifying data. REST combines this concept in conjunction with the "one URL per real world entity" concept already introduced. So you could send a GET request to the SA101 URL above to retrieve data about flight SA101, or a PUT request to modify data about SA101.
REST takes the view that HTTP methods and status codes are under-used and can be exploited in web APIs, as described below.
As mentioned above, the idea is that one single web resource (URL) can be used for retrieving, adding, and deleting data associated with a particular item, e.g. a particular song in the HitTastic! database. What we can do is to do different things with the song depending on the type of HTTP method we use to communicate with the URL. In general we:
Another feature of REST is statelessness, which involves not storing application state (such as sessions) on the server but instead passing it between server and client. This makes each API endpoint more loosely-coupled: it does not depend on a previous endpoint which might have stored application state in a session. Many contemporary web applications do this, for example rather than storing the username on the server, authentication is done via tokens which are passed between server and client.
With POST requests, we often need to send data to the server, for example when creating a new product in a products database for a shop, we might need to send the name, manufacturer and price. This is done by embedding the data in the request body, often as JSON, but also as key-value pairs. Last week we considered HTTP requests. Let's see an example of an HTTP POST request with embedded data:
POST /product/create HTTP/1.1
Host: www.solent-e-stores.com
Content-Type: application/json

{"name":"Corn Flakes","manufacturer":"Smith Emporium","price":1.29}
Note how we are sending POST data to /product/create and note how the HTTP request has a Content-Type of application/json (we covered MIME types last week). This is now telling the server (not the client) that what is being sent is JSON.
Note also how the request body begins after the headers, with a gap of one line. Note here, how the request body contains a JSON object containing details of a product.
How can we read the request body from an Express application?
When you wish to access the request body in your routes, you use
the req.body object. Here is an example of a
/product/create route which reads JSON from the request body
and performs an SQL INSERT statement with it:
app.use(express.json()); // necessary to read JSON data from the request body

app.post('/product/create', (req, res) => {
    try {
        const stmt = db.prepare('INSERT INTO products(name, manufacturer, price) VALUES (?,?,?)');

        const info = stmt.run(req.body.name, req.body.manufacturer, req.body.price);
        res.json({id: info.lastInsertRowid});
    } catch(error) {
        res.status(500).json({ error: error });
    }
});
Note how the info object has a lastInsertRowid property representing the primary key (ID) allocated to the new record. So if the operation was successful, we send back JSON containing the ID, which can then be used by the client.
When you are sending data to the server through the request body which is intended to update a record, you should, according to the principles of REST, use a PUT request. PUT requests work in a very similar way to POST requests: data is read from the request body and then used to update data. For example, this is a PUT endpoint which can be used to update a student's name and course:
app.put('/student/:id', (req, res) =>{
    try {
        const stmt = db.prepare('UPDATE students SET name=?,course=? WHERE id=?');
        const info = stmt.run(req.body.name, req.body.course, req.params.id);
        res.status(info.changes ? 200:404).json({success: info.changes ? true: false});
    } catch(error) {
        res.status(500).json({error: error});
    }
});
JSON is not the only way to send data to the server via the request body. In classic, non-AJAX applications, data is sent as URL-encoded form data: a series of key-value pairs separated by the ampersand character (&). In OODD you looked at forms with a method of POST, e.g.:
<!DOCTYPE html>
<html>
    <head>
        <meta http-equiv="Content-Type" content="text/html; charset=UTF-8">
        <title>Add a student</title>
    </head>
    <body>
        <h1>Add a student record</h1>


        <form action="./addStudent.jsp" method="post">
            <p>Student name:<input type="text" name="studentName" value="" /></p>
            <p>Student course:<input type="text" name="studentCourse" value="" /></p>
            <p>Student mark:<input type="text" name="studentMark" value="" /></p>
            <p>Student type:
            <select name='studentType'>
            <option>Undergraduate</option>
            <option>Masters</option>
            </select>
            </p>
            <input type="submit" value="Register student!" />
        </form>
        <br />
    </body>
</html>
Remember we had a form with fields for name, course, mark and student type. How is this actually sent to the server? The HTTP POST request looks something like this:
POST ./addStudent.jsp HTTP/1.1
Content-Type: application/x-www-form-urlencoded

studentName=Tim&studentCourse=Computing&studentMark=80&studentType=undergraduate
Note how the student details are sent through the HTTP request as a series of key-value pairs, with the keys corresponding to the form field names and the values corresponding to the details the user entered. Also note the
Content-Type of application/x-www-form-urlencoded, which tells the server that it is receiving URL-encoded form data, rather than JSON.
An Express server can interpret URL-encoded form data and place it in req.body by adding the line:
app.use(express.urlencoded({extended:false}));
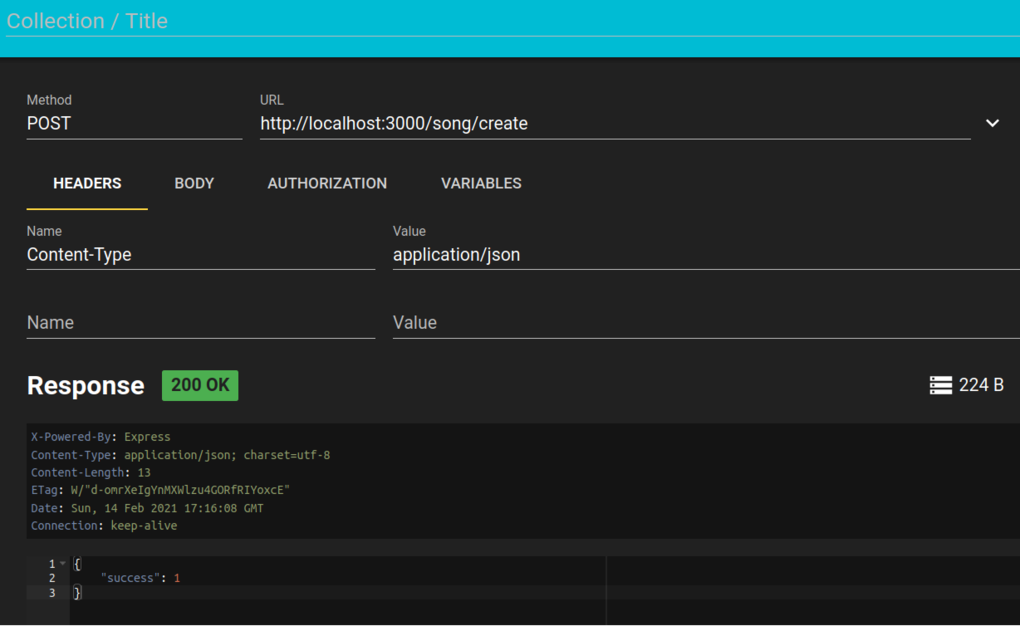
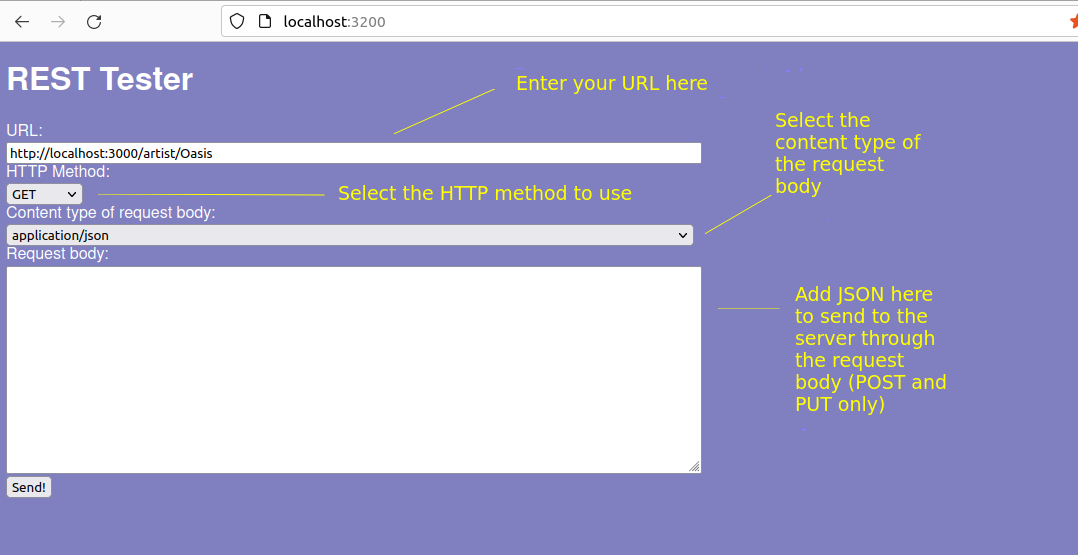
You can once again use RESTer or REST Tester to do this. Importantly, you must tell the server the content type of the request being sent. This is done by specifying the content type of the request (rather than the response). For example, if you are sending JSON through the request body, you must set the Content-Type header to application/json. This is how the server knows that JSON is being sent to it, and thus can process it appropriately.
The screenshot below shows how you can add headers to the HTTP request by selecting the Headers tab. Here we have specified the Content-Type as application/json:
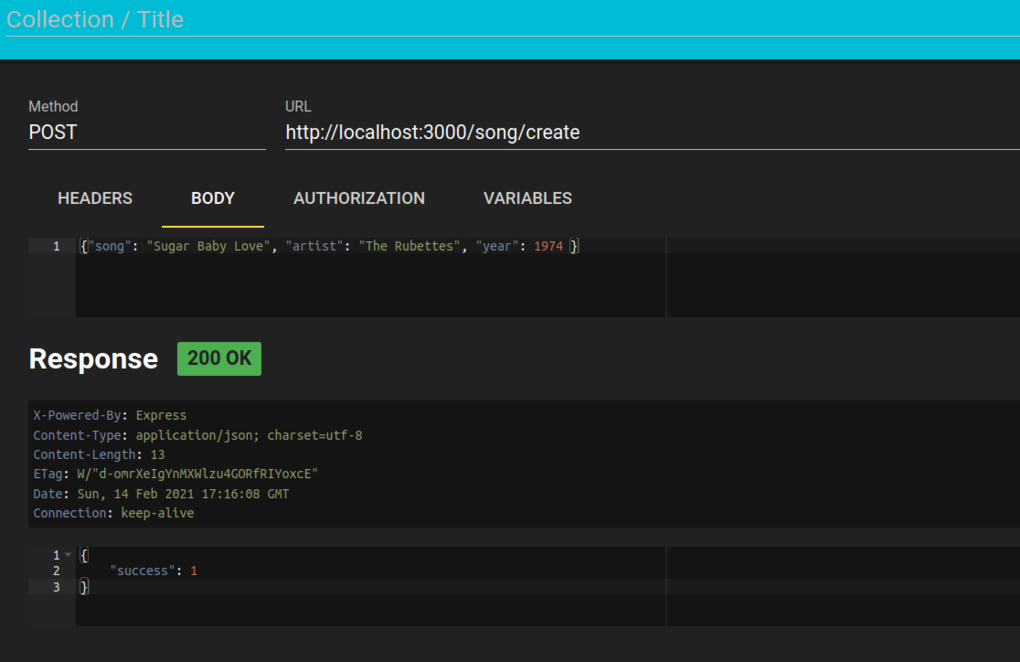
You can also add data to the request body. This is shown below, note how we have added JSON describing a song. (Prize to anyone who can guess why I have chosen this particular song...)
RESTer also allows you to test error conditions: if you supply invalid
request data and your web API checks for this, then you will get a non-200
status code returned.
REST Tester also allows you to send POST data through the request body, as you should be able to easily see from the interface. You must also set the content type of the request.
Add the following routes to your Web API from last week, and test them with RESTer or REST Tester.
This exercise is designed to show you how useful Web APIs are compared to standard HTML websites. Hopefully, you created a one-page "fan site" for one of your favourite artists in your own time before the class. If you didn't, do it now. It need only be HTML, but should set the colour and perhaps the font using CSS - enough to give it a distinctive style. You are going to use your Web API from week 1 to display all the songs of that artist on the "fan site".
app.get('/artist/:artist.html', (req, res) => {
    const stmt = db.prepare('SELECT * FROM wadsongs WHERE artist=?');
    const results = stmt.all(req.params.artist);
    const songsHTML = results.map ( song => `${song.title} by ${song.artist}, year ${song.year}, quantity ${song.quantity}, price ${song.price}`).join('<br />');
    res.send(`<div style='background-color: blue; color: white'>${songsHTML}</div>`);
});
What is this doing? It's a route which returns the search results as HTML, not JSON. It does this by using the map() function to convert the array of objects returned from stmt.all() into an array of HTML strings containing details of each song. This array is then combined into a single string of HTML using the join() function and sent back to the client. Note that the route is :artist.html so can be accessed by following the artist name with .html. In other words it looks, from the URL, like an HTML page, but is actually a dynamic route. Nonetheless the URL is a clean and logical URL representing a real-world entity, so is very much REST-compliant.http://localhost:3000/artist/Oasis.html
node-fetch to call the route from a Node application. node-fetch is a module to perform fetch requests from Node (rather than client-side JavaScript). You'll need to install it (npm i node-fetch). Here is an example:
import fetch from 'node-fetch';

app.get('/', (req, res) => {
    const response = fetch("http://localhost:3000/artist/your-artist.html")
        .then(response => response.text())
        .then(text => {
            res.render('index', {songs: text})
        });
});
You saw this kind of code last year when you looked at AJAX.<%-songs%>i.e. use -, not =. This is to prevent EJS encoding the HTML, which means the HTML will be interpreted as HTML, and not text.
response.json() to obtain the JSON as an object, e.g:
import fetch from 'node-fetch';

app.get('/', (req, res) => {
    const response = fetch("http://localhost:3000/artist/your-artist")
        .then(response => response.json())
        .then(songs => {
            res.render('index', {songs: songs})
        });
});
and then loop through the array of song objects in your EJS to display each song. To loop through your object in EJS, use code such as that given below. This uses a forEach() to loop through each song in the array, and display each property of each song.
<%
songs.forEach ( song =>{
    %>
    Title: <%=song.title %>

    Repeat for artist etc.
    <%
});
%>
Is the result better, compared to just "dumping" the HTML into the fan site?