In this week's topic you will be introduced to the concept of web APIs. You will get an initial idea of why they are useful, and will start to write a simple web API using Node.js and Express.
Think about the work you did last year in Web Technologies, in which you wrote a simple Node/Express server to search a database table and display the results using EJS. You generated HTML as the output format, so that the results look good in a browser.
The problem with HTML, however, is that it is a format specific to a browser. This is fine if we are simply writing a website to be viewed by an end-user in a browser. But the end-user is not the only potential user of the data. Other applications might want to make use of the content, for example a weather app running on Android or iOS might want to access weather forecasts from a weather website. Apps do not typically use HTML, they use their own user interface, so it would be better if our server delivered the data as raw data, without any presentation or formatting. An example of a raw data format is JSON, which you saw last year in COM419. Raw data could then be easily processed by any front end, for example:
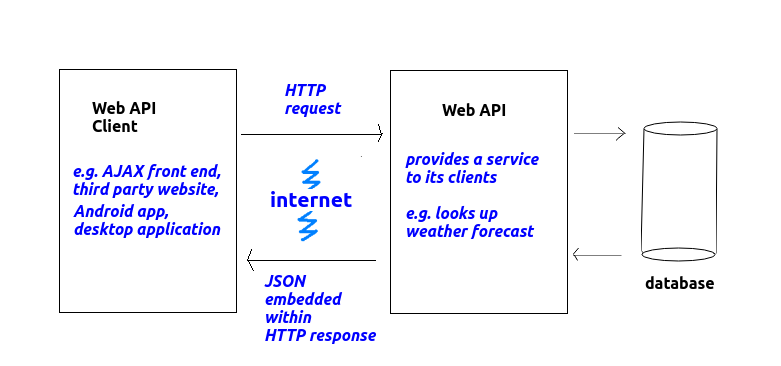
A web API is an application running on a web server which provides raw data (such as JSON) to other applications (client applications), as we saw above. Web APIs receive HTTP requests from clients, process the request, and deliver the response back as an HTTP response - but unlike the simple servers you saw last year, the response is delivered as raw data, rather than HTML. This is shown on the diagram below:
Here are a few examples of web APIs and their clients:
Web APIs obviously send back information to their clients, but as we have seen, a raw data format such as JSON is preferred to HTML. Why is this? HTML is not considered a good idea because it contains not only data, but also page structure information (headings, paragraphs, tables etc). A client website using the web API, or an app, might wish to arrange the information in a different way. We will look at this practically next week.
So what we want is a format which represents the data, and the data alone. There are a number of formats we can use, including JSON (JavaScript Object Notation), and also XML (eXtensible Markup Language). In this module we will focus on JSON, because it's the leading format, it is easy to generate on the server and to parse (interpret) on the client, and you have met it already.
JSON uses JavaScript syntax (hence the name) to represent data as it gets sent across the web. As you saw last year, JavaScript uses curly brackets {} to represent objects (similar to Python dictionaries in the sense that they consist of key/value pairs, though you can also add methods to objects) and square brackets [] to represent arrays. So with JSON we reuse this syntax to represent data, using curly brackets {} to represent a single entity (such as a person, a song or a film) and square brackets [] to represent a collection of entities (i.e. an array of entities).
Here is an example of a JSON object representing a single student.
{
    "name": "Tim Smith",
    "username": "2smitt82",
    "course": "Computer Studies"
}
Note how the JSON object representing the student is defined by curly brackets { and }, and inside the curly bracket, we specify each property of the student (name, username and course) and the corresponding value ("Tim Smith", "2smitt82", and "Computer Studies", respectively). A colon (:)
separates the property and the value, and a comma separates each property/value pair.
The next example shows a collection (array) of students. Note how we use the JSON array syntax [ and ] to define the collection, how each individual student object is represented by curly brackets { and }, and how each student object within the array is separated by a comma.
[
    {
      "name": "Tim Smith",
      "username": "2smitt82",
      "course": "Computer Studies"
    },

    {
      "name": "Jamie Bailey",
      "username": "1bailj39",
      "course": "Computer Studies"
    },

    {
      "name": "Deep Patel",
      "username": "0pated61",
      "course": "Networks and Web Design"
    }
]
In other modules you have looked at Node.js and Express. This section is provided for revision. Node.js can be downloaded from the website.
As you have seen, Node also comes with a package manager called npm. This allows you to use add-ons to Node (packages) which perform additional tasks, not part of the core Node.js distribution, such as communicating with a database. To use npm to install new packages, you enter:
npm install <packagename>at the command-line (e.g. DOS or Linux shell prompt).
See here for full Node API documentation.
It is possible to create a webserver from first principles in Node, using the HTTP module. However, as you have seen in previous modules, it's easier to use a pre-existing web server framework, and Express is perhaps the most widely used. The npm command below will install it:
npm install expressThis will install it locally to your current project. Or to install it globally so that it's accessible anywhere on your machine, for all projects and all users:
npm install -g expressOn Linux and other Unix-based systems, this requires 'sudo' rights (admin privileges).
The example below is the Hello World with Express. Note that there are two ways of including third-party modules such as Express: CommonJS modules and ECMAScript 6 modules. The latter is the currently-recommended approach and is a standard part of recent JavaScript. The difference when coding is that you use require() with CommonJS modules, but import with ECMAScript 6 modules. Note that if you use ECMAScript 6 modules in Node.js, you must save the file with a .mjs extension, not .js..
// app.mjs - use .mjs extension as ECMAScript 6 modules are used

import express from 'express';
const app = express();

app.get('/', (req,res)=> {
    res.send('Hello World from Express!');
});

app.listen(3000);
We import the express module, then create an Express
app object with express().
With Express, we set up routes. A route is a combination of a particular URL and a handler function for that URL. The URLs for a particular API are called API endpoints. So a route can be described as a handler for a particular endpoint, or set of endpoints (we can set up a single route to handle multiple URLs). In this example we are simply handling the top level, 'root' endpoint, so to request it from a browser, we would enter:
http://localhost:3000/without any parameters supplied.
The handler for the endpoint is a function which takes two parameters,
req representing the HTTP request and res representing the
HTTP response. In this example we call the send() method of the
response object to send back Hello World from Express! to the
client.
Here is an example of an Express server with two routes:
// app.mjs - use .mjs extension as ECMAScript 6 modules are used

import express from 'express';
const app = express();

app.get('/', (req,res)=> {
    res.send('Hello World from Express!');
});

app.get('/time', (req, res) => {
	res.send(`There have been ${Date.now()} milliseconds since 1/1/70.`);
});

app.listen(3000);
There are two routes, a default (or root route) which sends back a Hello World message, and a /time route which displays the number of milliseconds since the start of 1970.
These would be accessed with:
http://localhost:3000for the root route, and
http://localhost:3000/timefor the time route.
Remember that you use the node command to run a Node application. So if the above basic Express app is saved as app.mjs, you would run it with:
node app.mjsThis will run the server continuously in the background. To stop the server, you need to press
Control-C. You must do this if you change the server code as the server will not automatically reload if you change it!
Last year you used the SQLite relational database: if you remember, SQLite uses flat files rather than working with a full client-server database system.
You can download SQLite here. You can query and manipulate an SQLite database via the console-based sqlite3 tool, documented here and downloadable here along with the SQLite libraries. You can also upload a .db database to the online "fiddle" tool here and enter SQL statements to query and manipulate the database.
SQLite Studio allows you to manage an SQLite database graphically. A web-based alternative is mysqlview which also works with SQLite.
We are going to look now at how you can connect to an SQLite
database from Node.js. There are various
modules available to do the job, including better-sqlite3 which we will use as it is straightforward and, according to its developers, gives better performance than some alternatives. Documentation is available
here
To install, use npm as for last week from the command prompt, e.g:
npm install better-sqlite3
Here is a simple example. You need to import the Database class from the better-sqlite3 module and then create a Database object using your .db file:
import Database from 'better-sqlite3';
const db = new Database('mydatabase.db');

// Rest of the code follows...
Having revised some topics from last year we will now focus on how we can develop Web APIs with Node and Express. As we saw above, Web APIs are in fact very similar to standard web applications - but they deliver a pure data format, such as JSON, back to the client.
Individual routes within a Web API are known as API endpoints. So we could have one API endpoint for looking up all songs by a particular artist, one API endpoint for buying a song, one API endpoint for adding a new song, and so on.
You should revise HTTP requests and responses from OODD before looking at this topic.
It is a very common pattern in web development to develop a web API with a series of endpoints which manipulate the database in various ways, using HTTP methods appropriately for different operations. For example, if we are searching the database with a SELECT query, we use a GET method. If we are updating or inserting data, we use a POST method (or a PUT method - we will cover these next week) and if we are deleting data, we use a DELETE method. We can set these methods up in Express easily:
app.get('/endpoint1', ....);    // GET request
app.post('/endpoint2', ....);   // POST request
app.delete('/endpoint3', ....); // DELETE request
We can also use various HTTP methods from within our Express server
to signal different types of error, e.g.
status() method, eg.:
res.status(404);This pattern, of:
/songs/Oasis to represent all songs by
Oasis);We will now go through a series of example API endpoints using various methods, and which communicate with an SQLite database. You have already worked with SQLite databases from Node and Express. This year we are using a different module, better-sqlite3, but the style of code is similar.
The code below is a snippet of code showing an
API endpoint as part of an Express REST Web API. It perfoms an SQL
statement to find all students with the last name matching the
lastname parameter to the Express route, so that for example:
https://url-of-your-server.example.com/students/Smithwould find all students with the last name Smith.
app.get('/students/:lastname', (req, res) => {
    try {
        const stmt = db.prepare("SELECT * FROM students WHERE lastname=?");
        const results = stmt.all(req.params.lastname);
        res.json(results);
    } catch(error) {
        res.status(500).json({ error: error });
    }
});
We first create a prepared statement using the prepare() method of our database object. A prepared statement is a statement which has parameters bound to it, and then is compiled into a binary form which can be stored in memory and rapidly executed by the database. The advantage of a prepared statement is that once compiled, it can be rapidly executed again and again by the database if our application performs the same query multiple times. Prepared statements also prevent a certain type of security exploit known as SQL injection, in which a database can be compromised by the user entering fragments of SQL into a form which combine with existing SQL code in the JSP. We will look at SQL injection in more detail later in the module.
? We bind data to each placeholder when we execute the statement. To execute a SELECT statement we use the all() method of our prepared statement object, and pass the bound parameters as arguments. So here:
const results = stmt.all(req.params.lastname);will bind the
lastname parameter of the route to the first placeholder. The result will be that we query the database for all students with that last name.
The all() method returns an array of all matching rows from the database, as an array of JavaScript objects. We send back that array as JSON, using res.json(), which we saw last week.
Note also the use of a try/catch block. Those of you who have studied OODD (which I believe is everyone this year) will have seen this already. Basically we are trying to do something, and if it fails, we catch the error (exception) in the catch block. So, if there was an error, we send back a JSON object containing an error property with a value of the error that occurred, and also send back an HTTP status code of 500 (Internal Server Error) which, by convention, is used if the server encountered an internal error which was not caused by a user mistake.
This version returns all students in the database. Note that in this case, we don't need to specify a parameter to the the query, so stmt.all() takes no arguments.
app.get('/students', (req, res) => {
    try {
        const stmt = db.prepare("SELECT * FROM students");
        const results = stmt.all();
        res.json(results);
    } catch(error) {
        res.status(500).json({ error: error });
    }
});
Performing an UPDATE statement uses the same approach. Here is a route which could be used to buy a product with a given ID by reducing its quantity in stock by one. Note how this route has a method of POST, following the REST principles discussed above.
app.post('/products/:id/buy', (req, res) => {
    try {
        const stmt = db.prepare('UPDATE products SET quantity=quantity-1 WHERE id=?');
        const info = stmt.run(req.params.id);
        if(info.changes == 1) {
            res.json({success:1});
        } else {
            res.status(404).json({error: 'No product with that ID'});
        }
    } catch(error) {
        res.status(500).json({ error: error });
    }
});
Note that we use run(), rather than all(), with a statement which updates the database.
We use a try/catch block, as for the SELECT example. Also, we check the changes property of the info object returned from the query. This contains the number of rows affected by the SQL statement. If one row was updated, we send back a JSON success message. If not, the reason will be that there is no product with that ID. By convention, following the principles of REST, if we cannot find what we are looking for in a route, we send back the HTTP status code 404 (Not Found).
Note how the route contains the ID as a parameter (:id). You looked at this last year: parameters allow you to pass information into the route via the URL. So for example, the URL:
http://localhost:3000/products/201/buywould pass a parameter of
201 into the route. The parameter :id would have the value 201. Also remember how we use req.params to access parameters, so req.params.id represents the :id parameter.
DELETE is similar to UPDATE. As we saw above, a route which results in the deletion of data makes use of the HTTP DELETE method.
app.delete('/products/:id', (req, res) => {
    try {
        const stmt = db.prepare('DELETE FROM products WHERE id=?');
        const info = stmt.run(req.params.id);
        if(info.changes == 1) {
            res.json({success:1});
        } else {
            res.status(404).json({error: 'No product with that ID'});
        }
    } catch(error) {
        res.status(500).json({ error: error });
    }
});
Note how again we check the changes property of the results
to check whether it found the record to delete. Note also how the DELETE route takes in the ID as a parameter.
One question remains. How can you test out these methods? With GET methods, it's simple; you simply request the desired API endpoint in your browser and the appropriate route will be executed. However, with other methods, such as POST and DELETE, it's more difficult, as browsers always send GET requests when you type in a URL.
There are various third-party tools which can be used to test out APIs. A particularly useful one is RESTer, which is strongly recommended if using your own computer. However please note this is not available on the university computers and cannot be installed due to the controlled environment. This is a browser extension which allows you to simulate HTTP requests and is available for Chrome and Firefox. To install RESTer, visit either of these links and follow the instructions, and RESTer will be installed to your browser.
RESTer has an interface as shown below:
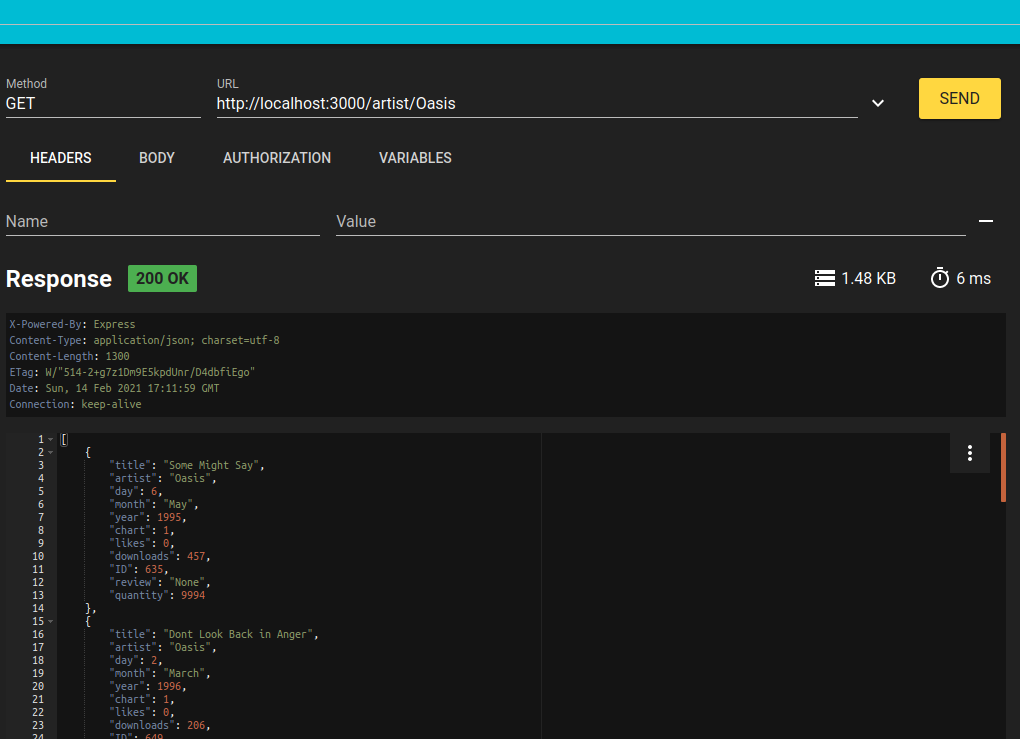
Note how RESTer allows you to specify, amongst other things:
https://url_of_your_server.example.com/artist/Oasis. Note how the response is shown below the controls, showing the status code, the response headers and the response body.
RESTer also allows you to test error conditions: if you supply invalid
request data and your web API checks for this, then you will get a non-200
status code returned.
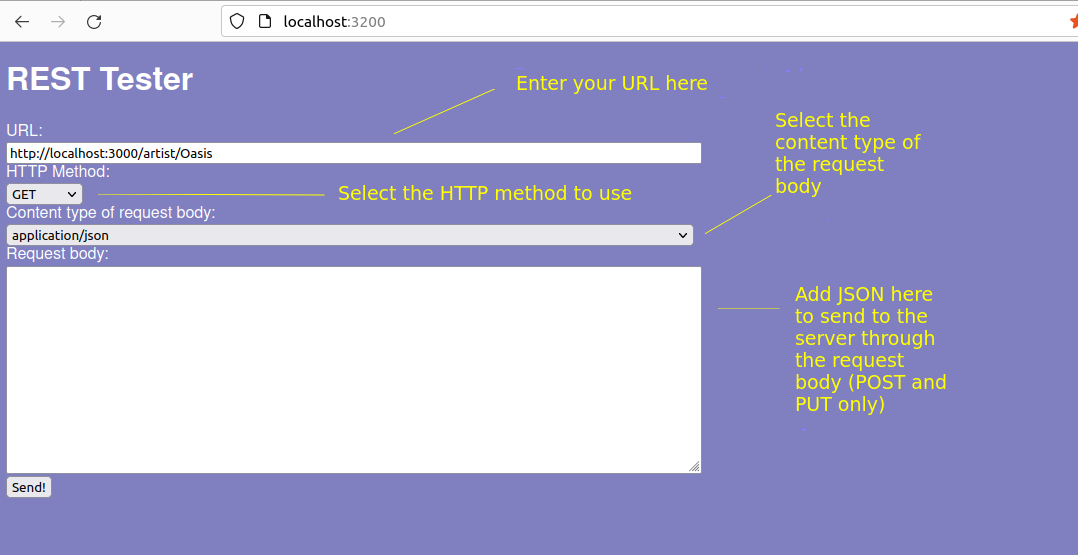
If you are on the university computers, you will be unable to use RESTer, but can use an alternative - more basic - tool called REST Tester. This can be downloaded from GitHub:
git clone https://github.com/nickw1/resttest.gitDownload this, change to its installation folder:
cd resttestand then install the dependencies:
npm installand run, e.g.:
node app.mjsor use PM2 (below). The application will run on port 3200, so you can access via:
http://localhost:3200It is shown below:
Important!As we need to devote part of the lab session in Week 1 to the introductory lecture, it is possible that you will not finish these, so time is allocated in Week 2 for you to finish them. In subsequent weeks the arrangement will bt the same as OODD: the background behind each topic will be covered in a lecture, which can be viewed as a live Teams session (time TBC) or as a recording in your own time.
/time route shown above to your Express server and test that./greet route which takes a name as a parameter and responds with "Hello" plus the name supplied.A useful thing to know is how to keep a Node app running when it has been started. This is obviously important on a live server, where we will want to restart the app if it crashes for any reason. So far, you have just started Node apps from the command-line, e.g:
node app.mjsand then stopped then with Control-C. Obviously though, this is not satisfactory for a production app, which needs to be running all the time.
So we need some kind of software to keep our Node server running
continuously. There are various options available, including Nodemon, together with the software we will examine, pm2 (see here). pm2
is a process manager typically used with Node applications, though it
can also be used to manage other background processes.
With pm2, you can launch a Node process in the background, stop it, start it and monitor how it is running. Furthermore if the process crashes, pm2 will restart it, which is again essential on a production server.
It can be installed with npm. Unlike the other NPM packages we have looked at so far, you will want to install it globally so that it is available to all applications and all users on your system. For example this command will
install it globally for all users if you are logged in as a user with admin
privileges on a Linux system (sudo means "run with root, or admin privileges", and -g indicates to install it globally):
sudo npm install -g pm2Or, if you do not have admin privileges, you can make
pm2 available
to all applications owned by your user by omitting the sudo:
npm install -g pm2
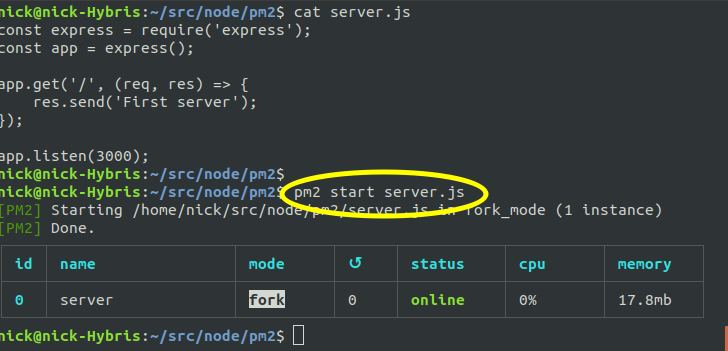
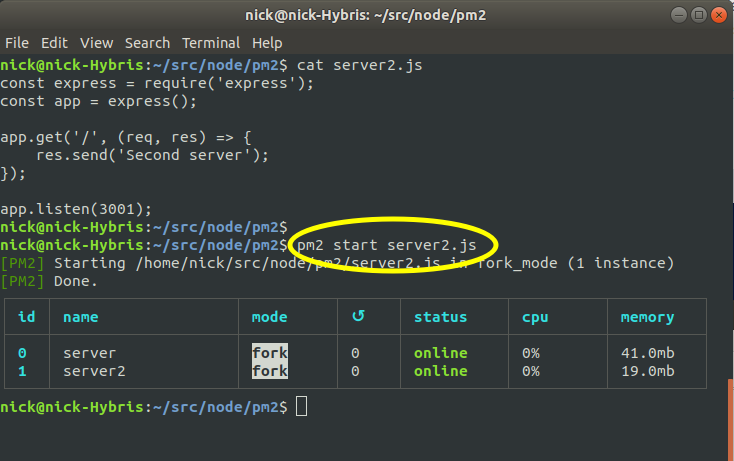
To start a given Node server with pm2 you use this command:
pm2 start name_of_file.mjsHere is an example. Note the
cat command on a Linux system
shows the contents of the file, this has been done to show the source code
of ths server:
The screenshot below shows starting a second process. Note that the second server runs on a different port, 3001, which allows both processes to run at the same time.
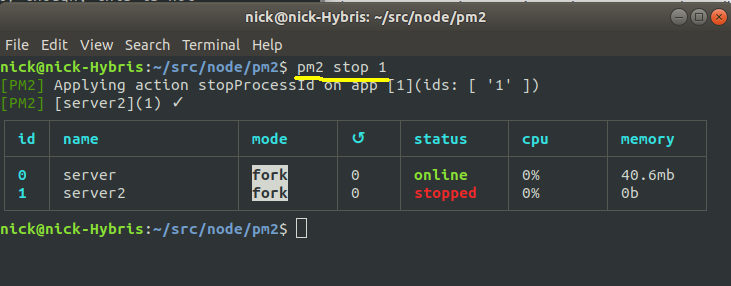
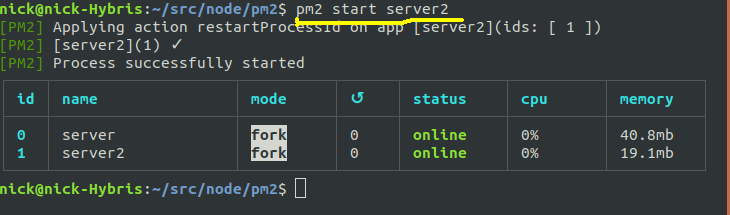
Once we've started a process, we can then stop it using
pm2 stop process_name_or_process_IDSo in the example below, we stop the second process, using its process ID (1):
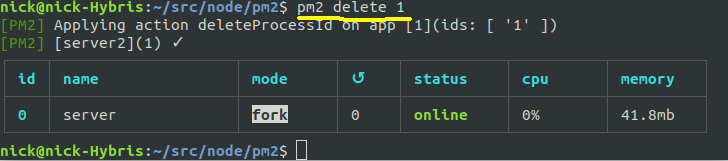
pm2 delete. So the example below stops, and completely removes from the list, the second server.
SecondServer). This is done using the --name option to pm2.
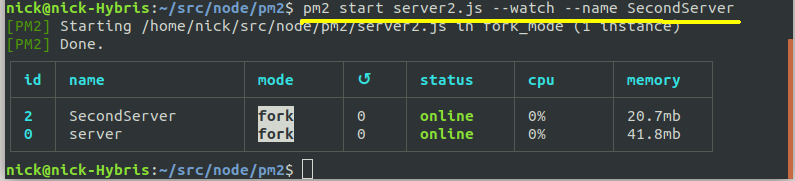
The above example also shows how to start a process in watch mode. Wtch mode will automatically restart the server if changes are made, which is very useful during development, as you do not have to keep stopping and restarting your server if you make changes. As can be seen in the example, the --watch option is used to add the process in watch mode:
pm2 start server2.mjs --watch --name SecondServer
You can also list all processes managed with pm2 without having to perform another operation. Just use pm2 list, e.g.:
